Setup Java RESTful Engine on Kubernetes with Docker Desktop
This article will outline how to setup our Java RESTful Engine on Kubernetes using Docker Desktop, and how to setup a a simulated shared storage in the case you are launching multiple instances of the engine.
What You Need
- Docker Desktop installed on your machine
- A Java RESTful Engine license key
Setting Up Kubernetes on Docker Desktop
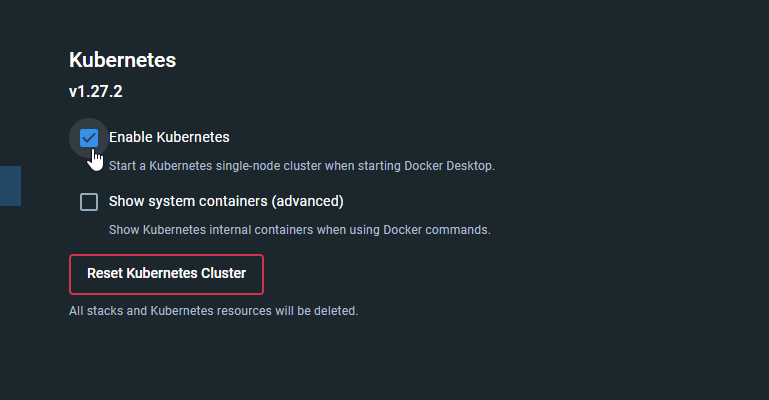
- Once you have downloaded and setup Docker Desktop, open the application and navigate to the setting by clicking the gear icon in the top right corner of the window, then click on "Kubernetes" in the left sidebar.
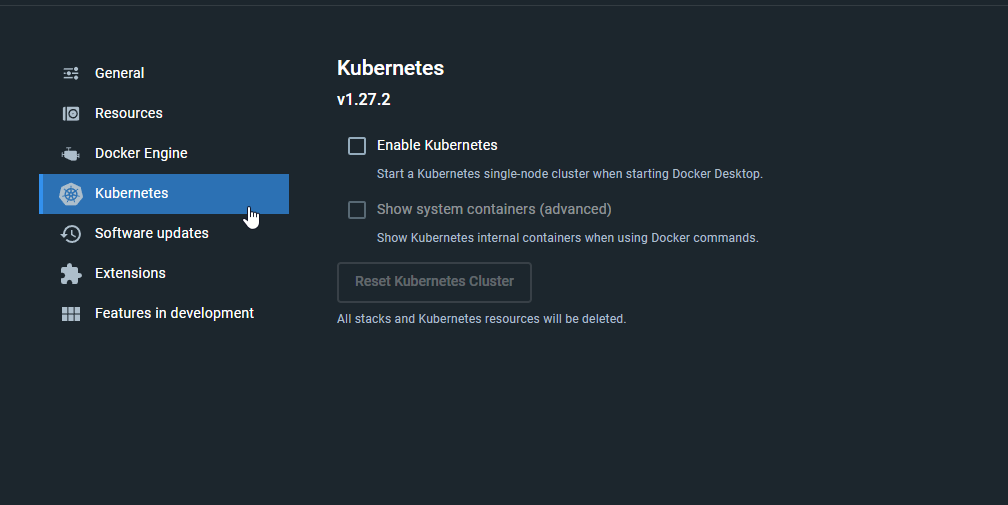
- Check the box to enable Kubernetes, then click "Apply & Restart" to start the Kubernetes cluster.
- Once the cluster is running, open a terminal window and run the following command to verify Kubernetes is running:
kubectl
Kubernetes is now setup on your machine.
Setting Up the Java RESTful Engine on Kubernetes
- Save the following YAML to your machine:
apiVersion: apps/v1
kind: Deployment
metadata:
  name: rest-deployment
  labels:
    app: rest-deployment
spec:
  selector:
    matchLabels:
      app: rest-deployment
  replicas: 1
  template:
    metadata:
      labels:
        app: rest-deployment
    spec:
      containers:
        - name: rest-deployment
          image: public.ecr.aws/apryse/fluent-restful:{LASTEST_VERSION}
          env:
            - name: X-WINDWARD-LICENSE
              value: "YOUR_LICENSE_KEY"
          ports:
          - containerPort: 8080
---
apiVersion: v1
kind: Service
metadata:
  name: rest-service
spec:
  type: NodePort
  selector:
    app: rest-deployment
  ports:
    - port: 8080
      targetPort: 8080
      nodePort: 30007
This YAML will spin up one instance of the Java RESTful Engine on Kubernetes. We will discuss launching multiple instances in the next section.
The first part of this YAML describes the Kubernetes deployment; we descrive the name of the deployment, the number of replicas, and the image to use.
Make sure to replace YOUR_LICENSE_KEY with your Java RESTful Engine license key.
The second part (seperated by ---) is a service that will expose the deployment so that it can be accessed from outside the cluster.
Note: Replace {LASTEST_VERSION} with the latest version of the Java RESTful Engine.
- Once you saved the above YAML to a file on your machine, open a terminal window and run the following command to deploy the Java RESTful Engine to Kubernetes:
kubectl apply -f path/to/your/file.yaml
This will execute the YAML file and deploy the Java RESTful Engine to Kubernetes, and create the service we defined to expose it.
- To verify the deployment, run the following command:
kubectl get deployments
You should see the rest-deployment listed in the output.
- To check the service, run the following command:
kubectl describe svc rest-service
This command will output the service details, including the NodePort that the service is running on. You can access the Java RESTful Engine by navigating to localhost:30007 in your browser.
You now have a single instance of the Java RESTful Engine running on Kubernetes. In the next section, we will discuss how to setup a shared storage for multiple instances of the engine.
Setting Up Shared Storage for Multiple Instances
When running multiple instances of the Java RESTful Engine on Kubernetes, you will need to setup a shared storage so that the instances can communicate with each other. We will use a simulated shared storage using Docker Desktop for this example, but you can use any shared storage solution that you prefer, for more information check click here.
These steps assume you have already setup Kubernetes on Docker Desktop as outlined in the previous section.
- Modify the YAML file you created in the previous section to include a volume mount for the shared storage. This is what the modified YAML should look like:
apiVersion: apps/v1
kind: Deployment
metadata:
  name: rest-deployment
  labels:
    app: rest-deployment
spec:
  selector:
    matchLabels:
      app: rest-deployment
  replicas: 3
  template:
    metadata:
      labels:
        app: rest-deployment
    spec:
      containers:
        - name: rest-deployment
          image: public.ecr.aws/apryse/fluent-restful:24.2.1.4
          env:
            - name: X-WINDWARD-LICENSE
              value: "YOUR_LICENSE_KEY"
          ports:
          - containerPort: 8080
          volumeMounts:
            - name: rest-pv-storage
              mountPath: /usr/local/tomcat/webapps/App_Data/requests
      volumes:
        - name: rest-pv-storage
          hostPath:
            path: /run/desktop/mnt/host/c/kubernetesTest
            type: DirectoryOrCreate
---
apiVersion: v1
kind: Service
metadata:
  name: rest-service
spec:
  type: NodePort
  selector:
    app: rest-deployment
  ports:
    - port: 8080
      targetPort: 8080
      nodePort: 30007
This YAML will spin up three instances of the Java RESTful Engine on Kubernetes, and mount a shared storage volume to each instance. The volume mount is defined in the volumeMounts section of the deployment, and the volume itself is defined in the volumes section.
Make sure to replace YOUR_LICENSE_KEY with your Java RESTful Engine license key.
This code assumes our host machine is running Windows, and the shared storage is located at C:\kubernetesTest so all the output will be written out to there. If you are running on a different OS, you will need to modify the hostPath to point to the correct location. With this setup, each instance of the Java RESTful Engine will be able to read and write to the shared storage.
You can increase the number of replicas in the deployment to run more instances of the Java RESTful Engine.
Same as before, replace {LASTEST_VERSION} with the latest version of the Java RESTful Engine.
- Once you have modified the YAML file, run the following command to deploy the Java RESTful Engine with shared storage to Kubernetes:
kubectl apply -f path/to/your/file.yaml
This will deploy the Java RESTful Engine with shared storage to Kubernetes.
- To verify the deployment, run the following command:
kubectl get deployments
You should see the rest-deployment listed in the output.
- To check the service, run the following command:
kubectl describe svc rest-service
This command will output the service details, including the NodePort that the service is running on. You can access the Java RESTful Engine by navigating to localhost:30007 in your browser.