Install Fluent Java RESTful Engine With Docker Desktop
As of version 23.2+ we began offering a Fluent Java RESTful Docker image. This should eliminate time spent setting up our Java RESTful engine and allow you to start processing your templates in no time with ease! This article will outline the steps you need to make use of our Docker image.
Requirements
Setup Steps
Step 1: Installing Docker Desktop
Download Docker Desktop from the links above and install. To verify you installation, run the following command in your command prompt:
docker
If it returns a list of arguments, then Docker is installed on your machine. Additionally, Docker must be configured to run Linux Containers to successfully containerize the Fluent JavaRESTful engine. To check, right-click on the docker icon located in the hidden icons section of the Windows taskbar.


If the menu that appears says "Switch to Linux containers..." then Docker is configured to run Windows containers. If the menu says "Switch to Windows containers..." then Docker is configured to run Linux containers. To switch, simply click that option in the menu and select "Switch" in the resulting pop-up. We want to use Linux containers.
Step 2: Pulling the Fluent Docker Image
To pull the Docker image, you need to run the following command in your command line
docker pull public.ecr.aws/apryse/fluent-restful:{VERSION}
Where {VERSION} is the version of the Java RESTful engine you wish to use. All available versions can be seen by browsing here, then choosing the "Image tags" tab. You may also replace {VERSION} with latest if you wish to just use the latest engine version instead of a specific version.
To verify that the image was pulled successfully, open Docker Desktop, and navigate to the Images tab:
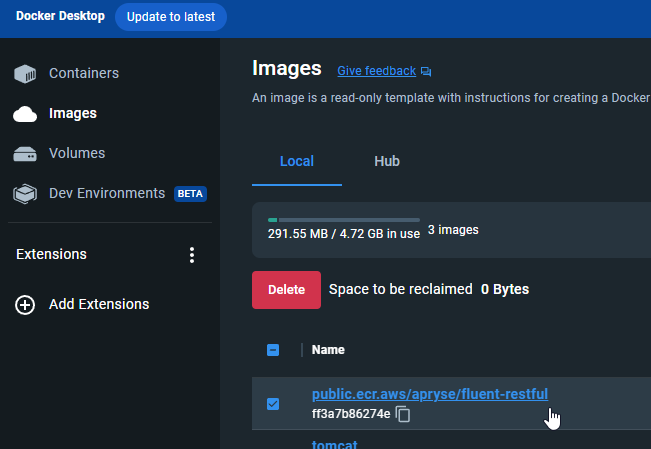
You will see the image public.ecr.aws/apryse/fluent-restful in there.
Step 3: Launching a Container Using the Fluent Docker Image
To launch a container using the image, open Docker Desktop, navigate to the images tab as before and find the fluent-restful image.

A "Run a new Container" window will open, assign the container a name and a port as shown below:
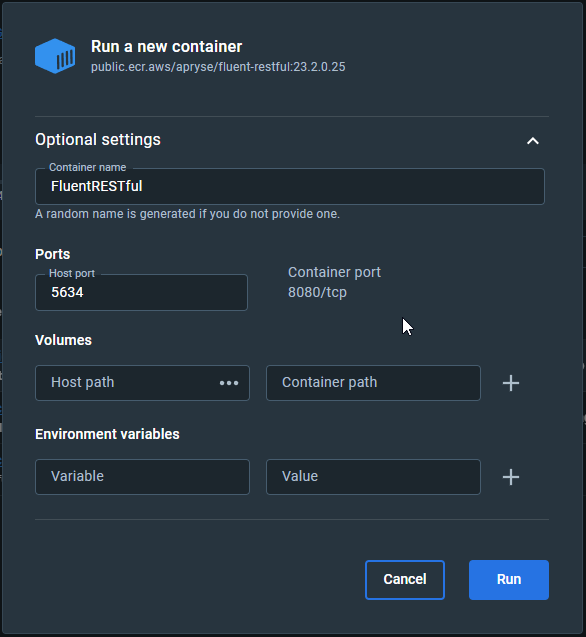
NOTE: You can set the port to any port available on your machine that is not blocked by firewalls
Starting in Version 24.2.0, you can specify any properties for the Java RESTful engine in the Environment Variables section.
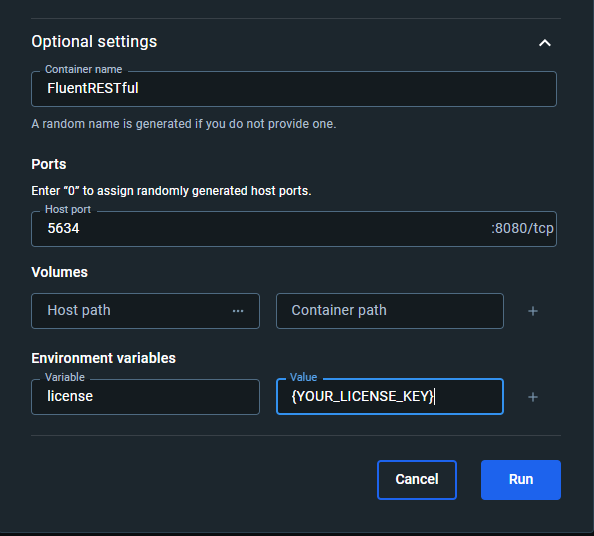
Step 4: Setting the License Key
Finally we need to set the License Key. There are a few ways to do this but we will conver the easiest way here by setting it as an environment variable.
If you are usiing a version prior to 24.2.0 or would like to set the license a different way, please refer to the Set License Key for Java RESTful Engine in Docker Container article.
To do this, under the Environment Variables section, add a new variable with the name license and the value as your license key.
Step 5: Running the Container
At this point, you should have your container configured with a name, port, and license key. Now just click run. This will startup the container as well as the RESTful engine. You can test this by visiting the following url in your browser:
http://localhost:[PORT]/
Where port is the port number you assigned when configuring the container
And thats it! Your container is now running with our Fluent Java RESTful Engine. To see how to use your license key, please follow the instructions below.