Data Access Providers and Authentication Protocols Reference
::: Starting in v15.1.48.0, Fluent is using a single interface to specify the information needed to access secured file- and web-based data. This interface allows you to provide the credentials needed to access your Template data source, and to access Report Templates imported by Import Tags. :::
Data Access Providers
Access Providers implement the authentication protocols needed to access modern, secured file- and web-based data. Fluent provides the following Access Providers:
| Fluent Designer, .NET Report Engine, Report Engine for RESTful | Java Report Engine |
|---|---|
| File based - anonymous and Windows Identity | File based - anonymous |
| HTTP - anonymous | HTTP - anonymous |
| HTTP - basic | HTTP - basic |
| HTTP - digest | HTTP - digest |
| HTTP - negotiate (NTLM and Kerberos) | All HTTP - try to use all the HTTP protocols above |
| All HTTP - try to use all the HTTP protocols above | |
| Open Authorization (OAuth) | |
| WS-Trust |
Here is a brief description of each Access Provider:
AllHttp: uses all of the HTTP authentication protocols and keeps the result from the first one to respond Status 200 (success) instead of Status 401(unauthorized). This is the order it tries to use them: Anonymous, Basic, Digest, Negotiate. This is slow, so it shouldn't be used if you know what authentication protocol your server requires.
Anonymous: no authentication header is sent. This should be used when an HTTP resource is not guarded by any authentication.
Basic: an authentication header with basic authentication is sent. Basic authentication is just a username and (base64-encoded) password. The server hosting the HTTP resource must be configured to allow basic authentication.
Digest: use the digest authentication protocol for passing credentials. This Wikipedia page explains how it works. The server hosting the HTTP resource must be configured to allow digest authentication.
FileSystem and Negotiate: This is also known as Windows Authentication. It will work for servers configured to allow either NTLM or Kerberos authentication.
OAuth2: A form of claims-based authentication. One server (at the Authority URI) gives out tokens that contain information on what a client is allowed to access. ClientID identifies the client application (this is the ID the customer registers as Fluent Designer in their Active Directory Federation Services server). Redirect Url is where they would be redirected back to after authenticating with the Authority URI (since Fluent Designer is not a web application this can be any URL as long as it matches the URL registered with Active Directory Federation Services). Resource is the resource we are trying to access with this HTTP request (this should almost always match the value provided in XML (File/URL)). TrustAllCert ignores SSL/TLS certificate errors from the site.
OAuth2WsTrust: This is the same as WsTrust. WsTrust is another form of claims-based authentication that has the same use case as OAuth2, but the username and password can be provided programmatically instead of via a browser dialog that will pop up while obtaining the initial token. Everything else is the same as OAuth2.
Authentication Protocol Interface
In the Authentication Protocol field (see screenshots below), select the type you want from the dropdown menu and then fill in the credential fields for that option. This combination defines the protocol and its properties, and is saved as a connection string in the form “AccessProvider=Basic;Username=username;Password=password;”
- All of the connection string keywords and any of the common values are in BaseAccessProvider.java if needed directly in your code. Fluent Designer will build this string for you.
- One of the protocols is FileBased which is used for reading a local file as well as HTTP files.
- If no AccessProvider is set in the connection string, Fluent it will look at the URL and set it to AllHttp if the URL starts with "http:", "https:", "ftp:", etc. Otherwise it is set to FileBased.
Via the Connection Editor
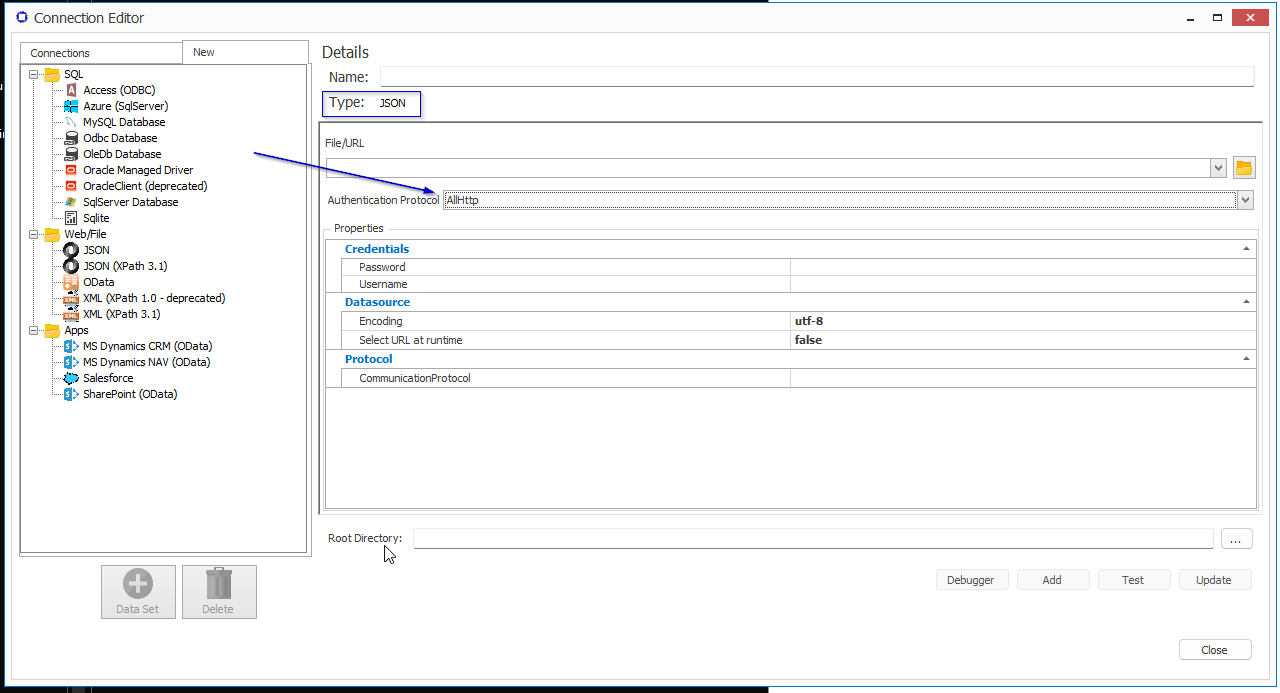
When you edit or create a new web- or file-based data source (i.e. JSON, XML or OData) in the Connection Editor, you can optionally set the Authentication Protocol. In Fluent Designer this is done by selecting the protocol itself and then setting the properties for that protocol.
Open the Connection Editor and edit or create a new Web/File data source connection. In the Authentication Protocol field, select the protocol you want from the dropdown menu, then fill in the properties fields for that protocol. The Connection Editor interface will look slightly different depending on the type of data source connection.

Via an Import Tag
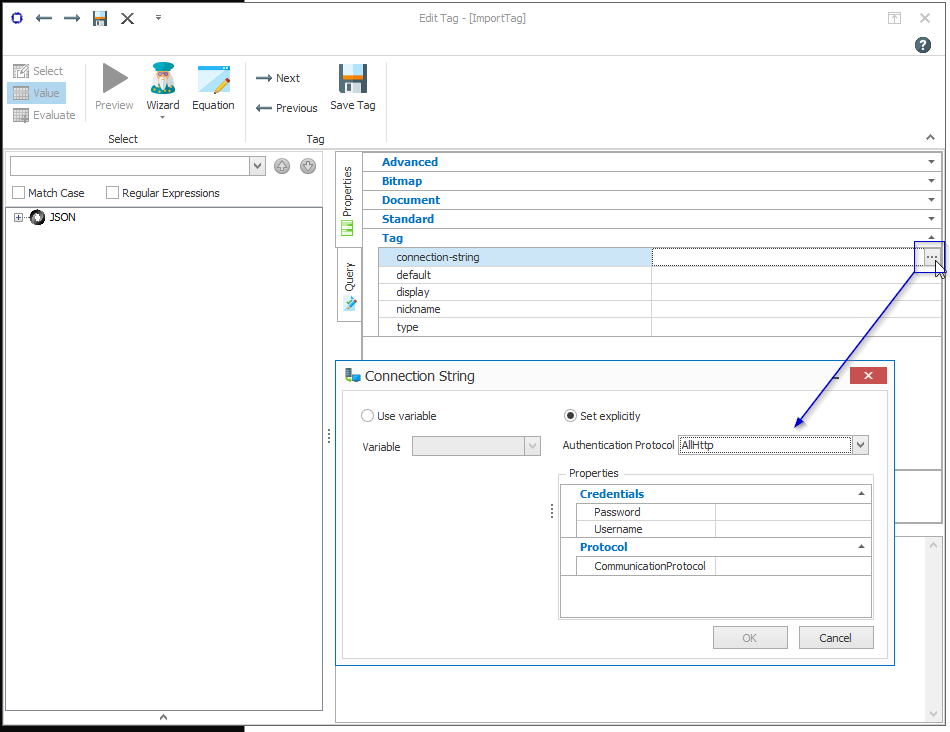
To access the Authentication Protocol for an Import Tag, open the Tag Editor and navigate to the Properties pane. In the Tag Properties, click the [...] button to bring up the Connection String interface.

Connection String Interface
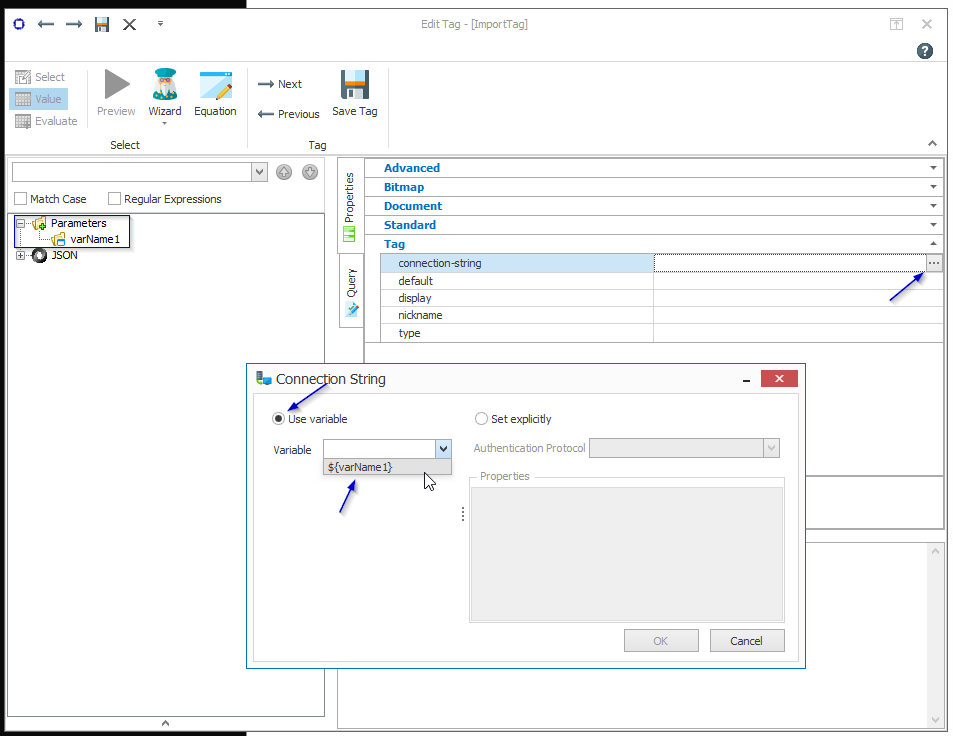
Use variable
If you select Use variable, the variable dropdown menu will show all variables defined in the Template you have open. The variable must be set to the connection string you want to use; a Set Tag is usually the best Tag to use for this. Use variable is very useful if the username/password is to be set differently during production. It is also useful if the same protocol and credentials are used with multiple Import Tags.
Set explicitly
Use this option to set the properties for this particular Authentication Protocol. The fields will be the same as those used in the data source Connection Editor.
Normally the Import Tag will return something like "http://www.apryse.com/images/logo.png" and all of the access provider information is set as above. However, if you type or paste a select into your Query Pane similar to what is shown below (note the beginning "Url="),
Url=http://www.apryse.com/images/logo.png;AccessProvider=Digest;Username=yourusername;Password=yourpassword;
all of the above authentication protocol properties, if they exist, are ignored. Instead, Fluent assumes the returned value is the entire connection string.
How to Pass Credentials to an Import Tag Via an Engine
Create an Input Parameter
In your Report Template in Fluent Designer, create an Input Parameter. Note the parameter's name and default value, you will use them later. When output from the Template, the value entered into the Input Parameter will be of the form:
“AccessProvider=Basic;Username=username;Password=password;”
Set the Input Parameter in an Import Tag Connection-string Property
Open your Import Tag and navigate to the Properties Pane. Open the Connection String interface, click on Use Variable, and select the variable name from the dropdown menu.

How to Create a Custom Access Provider
Coding Steps
Create a new .NET class library project in Visual Studio, and add assembly references to WindwardReportDrivers.dll, WindwardReports.dll, and IKVM.OpenJDK.Core.
- If you have installed the .NET Report Engine these assemblies will be in a folder called DLL in your Fluent installation directory or in the GAC depending on the options you selected during installation.
- If you have Fluent Designer installed these assemblies will be in the GAC.
Next, create a new class that inherits from WindwardReportsDrivers.net.windward.AccessProviders.protocols.HttpAccessProvider, and implement the required methods (see descriptions and example below).
| Method | Description |
|---|---|
| Properties{get;} | Define a list of properties required to make your connection. |
| GetConnectionStringProperties() | Convert a connection string into a dictionary of properties. |
| CreateConnectionString() | Convert a dictionary of properties into a connection string. |
| Name{get;} | Name of your Access Provider. |
| Description{get;} | Description of your Access Provider. |
| Request() | Do the actual work of creating and sending the HTTP request. |
Example
using System;
using System.Collections.Generic;
using System.Linq;
using System.Net;
using System.Text;
using System.Threading.Tasks;
using net.windward.util;
using net.windward.util.AccessProviders;
using WindwardReportsDrivers.net.windward.AccessProviders;
using WindwardReportsDrivers.net.windward.AccessProviders.protocols;
using Convert = System.Convert;
namespace SampleAccessProvider
{
    public class SampleHttpAccessProvider : HttpAccessProvider
    {
        private static readonly string USERNAME = "Username";
        private static readonly string PASSWORD = "Password";
        /// <summary>
        /// This provides a list of the properties that are needed for this connection.
        /// This list will be used to form the property grid for this connection in AutoTag.
        /// </summary>
        public override List<PropertyInfo> Properties
        {
            get
            {
                return new List<PropertyInfo>
                {
                    //Arguments for property info constructor.
                    //arg 1: prompt for the property: This is the way the property will be displayed in the connection grid.
                    //arg 2: Property discription: This will be used for tool tips in the AutoTag UI.
                    //arg 3: Property Key: The name of this property to be used in the connection string. (ex Username=example@windward.net)
                    //arg 4: Default value: A default value for this property.
                    //arg 5: Property type: the type this property needs to be when passed for the connection. (note: if you specify integer all values provided must be parsable as integers)
                    //arg 6: IsPassword: Only used to determine if property should be masked in the ui.
                    new PropertyInfo("Username", "The username for the connection", USERNAME, "",typeof(string), false),
                    new PropertyInfo("Password", "The password for the connection", PASSWORD, "", typeof(string), true)
                };
            }
        }


        /// <summary>
        /// returns the properties from the connection string as a Dictionary
        /// </summary>
        /// <param name="connectionString"></param>
        /// <returns></returns>
        public override Dictionary<string, string> GetConnectionStringProperties(string connectionString)
        {
            Dictionary<string, string> dict = new Dictionary<string, string>();
            //grab any properties you have defined as required in your in your properties list.
            string username = StringUtils.getConnectionStringProperty(connectionString, USERNAME);
            dict.Add(USERNAME, username);
            string password = StringUtils.getConnectionStringProperty(connectionString, PASSWORD);
            dict.Add(PASSWORD, password);

            //the url that will be used for this connection
            string connectionUrl = StringUtils.getConnectionStringProperty(connectionString,
                BaseAccessProvider.CONNECTION_URL);
            dict.Add(CONNECTION_URL, connectionUrl);


            //you will also need the type of this provider.
            dict.Add(CONNECTION_ACCESS_PROVIDER, Name);


            return dict;
        }


        /// <summary>
        /// Returns a connection string using the provided properties
        /// </summary>
        /// <param name="properties"></param>
        /// <returns></returns>
        public override string CreateConnectionString(Dictionary<string, string> properties)
        {
            StringBuilder connStrBuilder = new StringBuilder();
            //add our access provider to the string
            connStrBuilder.Append(string.Format("{0}={1};", CONNECTION_ACCESS_PROVIDER, Name));
            if(properties.ContainsKey(CONNECTION_URL))
                connStrBuilder.Append(string.Format("{0}={1};", CONNECTION_URL, properties[CONNECTION_URL]));
            if (properties.ContainsKey(USERNAME))
                connStrBuilder.Append(string.Format("{0}={1};", USERNAME, properties[USERNAME]));
            if (properties.ContainsKey(PASSWORD))
                connStrBuilder.Append(string.Format("{0}={1};", USERNAME, properties[USERNAME]));


            return connStrBuilder.ToString();
        }


        /// <summary>
        /// The name of this access provider.
        /// </summary>
        public override string Name { get { return "BasicHttpAccessProviderExample"; } }


        /// <summary>
        /// A Description of what this access provider is for.
        /// </summary>
        public override string Description { get
            {
                return "An example of an AccessProvider implementing basic http authentication.";
            }
        }

        /// <summary>
        /// Handles building your custom request.
        /// </summary>
        /// <param name="url">The url to make the request from</param>
        /// <param name="credentials">If you use the static user name and password strings from BaseFullAccessProvider to define your props your credentails will be here</param>
        /// <param name="headers">http headers for "content-type" and "accept" if applicable</param>
        /// <param name="allProps">A dictionary of all the properties you have defined for your connection.</param>
        /// <returns></returns>
        public override ResponseHttp Request(string url, NetworkCredential credentials, IDictionary<string, string> headers, Dictionary<string, string> allProps)
        {
            HttpWebRequest request = (HttpWebRequest)BuildRequest(url, headers);


            //set up basic authentication
            request.KeepAlive = true;
            // this part is not used until after a request is refused, but we add it anyways
            CredentialCache myCache = new CredentialCache();
            myCache.Add(new Uri(url), "Basic", credentials);
            request.Credentials = myCache;


            // this is how we put the uname/pw in the first request (avoids 2 tries to succeed)
            string cre = string.Format("{0}:{1}", allProps[USERNAME], allProps[PASSWORD]);
            byte[] bytes = Encoding.ASCII.GetBytes(cre);
            string base64 = Convert.ToBase64String(bytes);
            request.Headers.Add("Authorization", "Basic " + base64);


            return new ResponseHttp(request.GetResponse(), url);
        }
    }
}
Register the Custom Access Provider
Add your dll to the <WindwardReports> section of Fluent Designer or .NET Report Engine config file (depending on if you are using the engine or AutoTag) as shown below.
<?xml version="1.0"?>
<configuration>
    <configSections>
        <section name="WindwardReports" type="System.Configuration.NameValueSectionHandler, System, Version=2.0.0.0, Culture=neutral, PublicKeyToken=b77a5c561934e089"/>
    </configSections>
    <WindwardReports>
        <add key="ImportFileClass" value="C:\full\path\to\my\AccessProvider.dll=ClassName.Including.Namespace.For.MyAccessProvider"/>
    </WindwardReports>
</configuration>