Fluent Manager SSO
Single Sign-On (SSO) is an authentication method that allows users to sign in using one set of credentials to multiple independent software systems. SSO provides a seamless experience for users when using your applications and services. Instead of having to remember separate sets of credentials for each application or service, users can simply log in once and access your full suite of applications.
You can configure Fluent Manager to work with SSO by enabling Single Sign-On authentication via SAML 2.0. In this case, Manager will act as a service provider, while any SSO provider can act as an Identity Provider. Note that Fluent Manager has only been tested with Microsoft Entra ID (formerly known as Azure Active Directory) and Keycloak. You can find detailed documentation for the mentioned providers below. If you are using any other SSO provider then the setup steps will be quite similar. If you find that Manager is not flexible enough to work with your SSO provider, please contact us and we'll look at extending Manager's SSO functionality to support your provider.
Here are a few situations in which setting up Manager integration with SSO might be useful:
- SSO is often used in an enterprise context, when user applications are assigned and managed by an internal IT team. For example, if you already have a large number of SSO users, you can connect your SSO provider to Manager so you don't have to create an account for each individual user.
- SSO solutions often provide enhanced security and visibility, enabling better workflows. For example, you can set up multi-factor authentication to increase the security of Fluent Manager.
- SSO reduces the time employees spend signing on and dealing with passwords, increasing their productivity.
You can find even more examples, it all depends on your situation and the benefits you want to gain.
How to set up SSO
Only users with the Global Administrator role have permissions to configure SSO.
To start setting up SSO, go to the application settings by clicking on the gear button in the upper right corner. Then select ’ SSO configurations’ from the list of settings on the left.
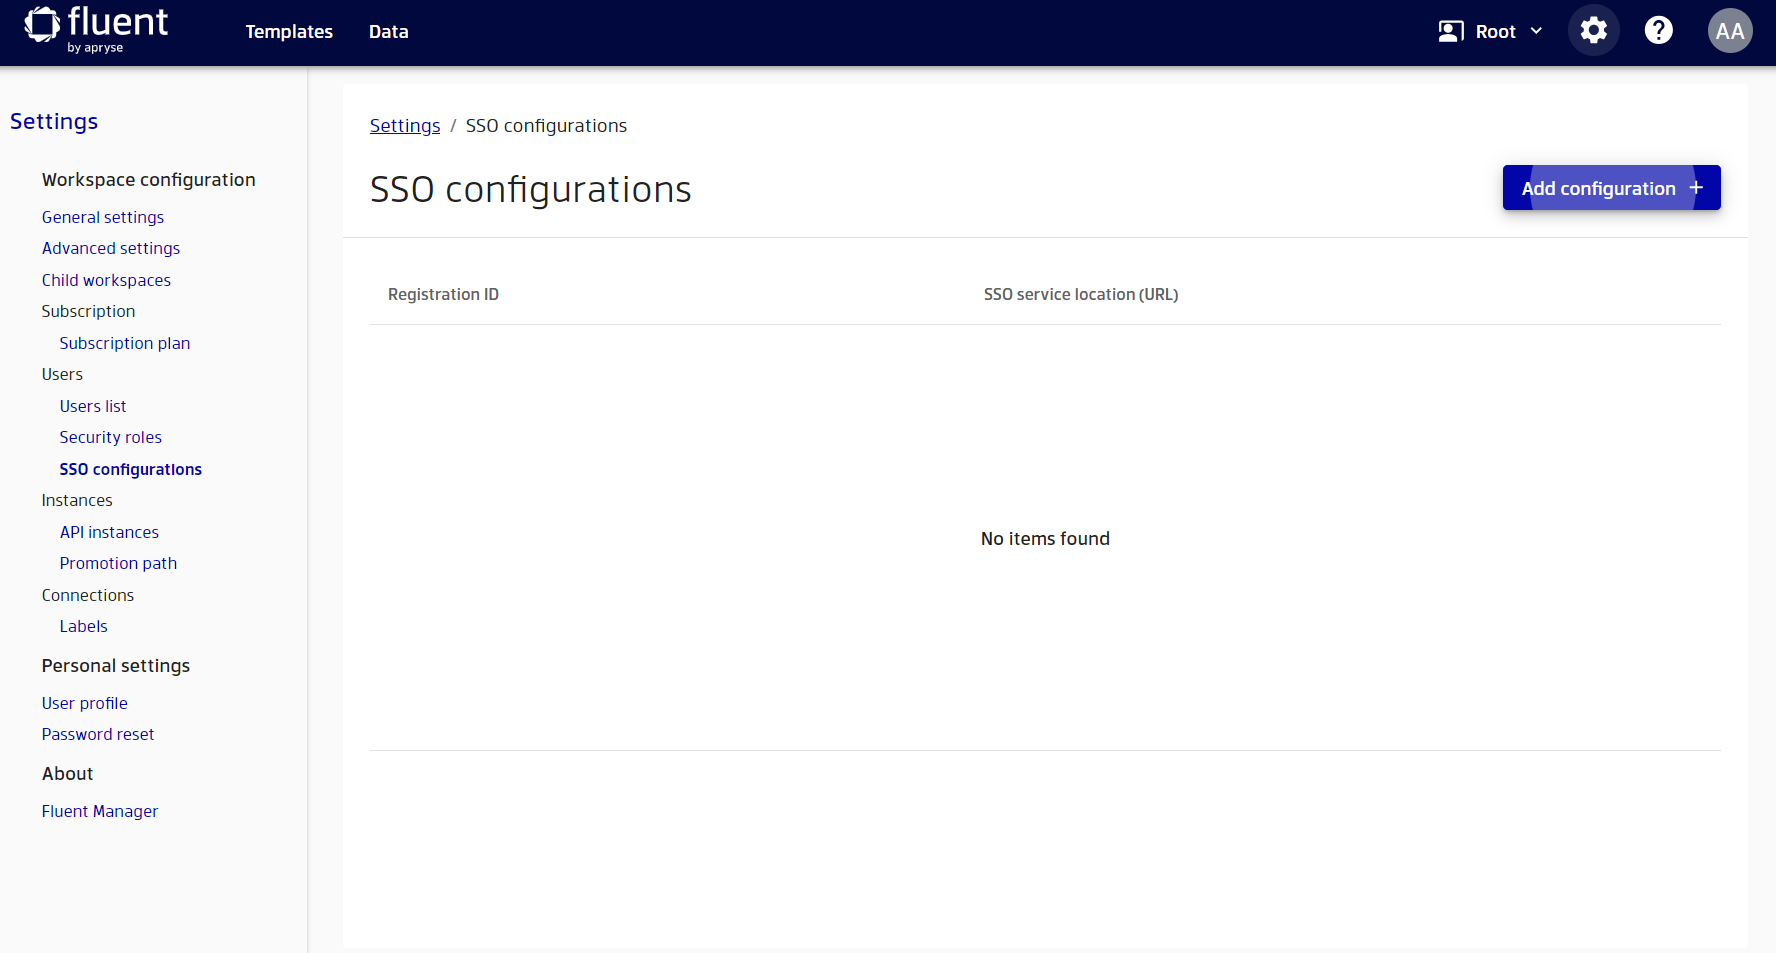
You will see a list of all configured SSO providers. You can set up multiple providers if you want. In our case we don't have any providers yet, let's create our first provider by clicking on the ‘Add configuration’ button.

We will see a wizard that guides you through the process of creating an SSO configuration. There are many options for potential configuration, but not every option is required to be configured. You can find a description of each option by hovering over the option of your interest.

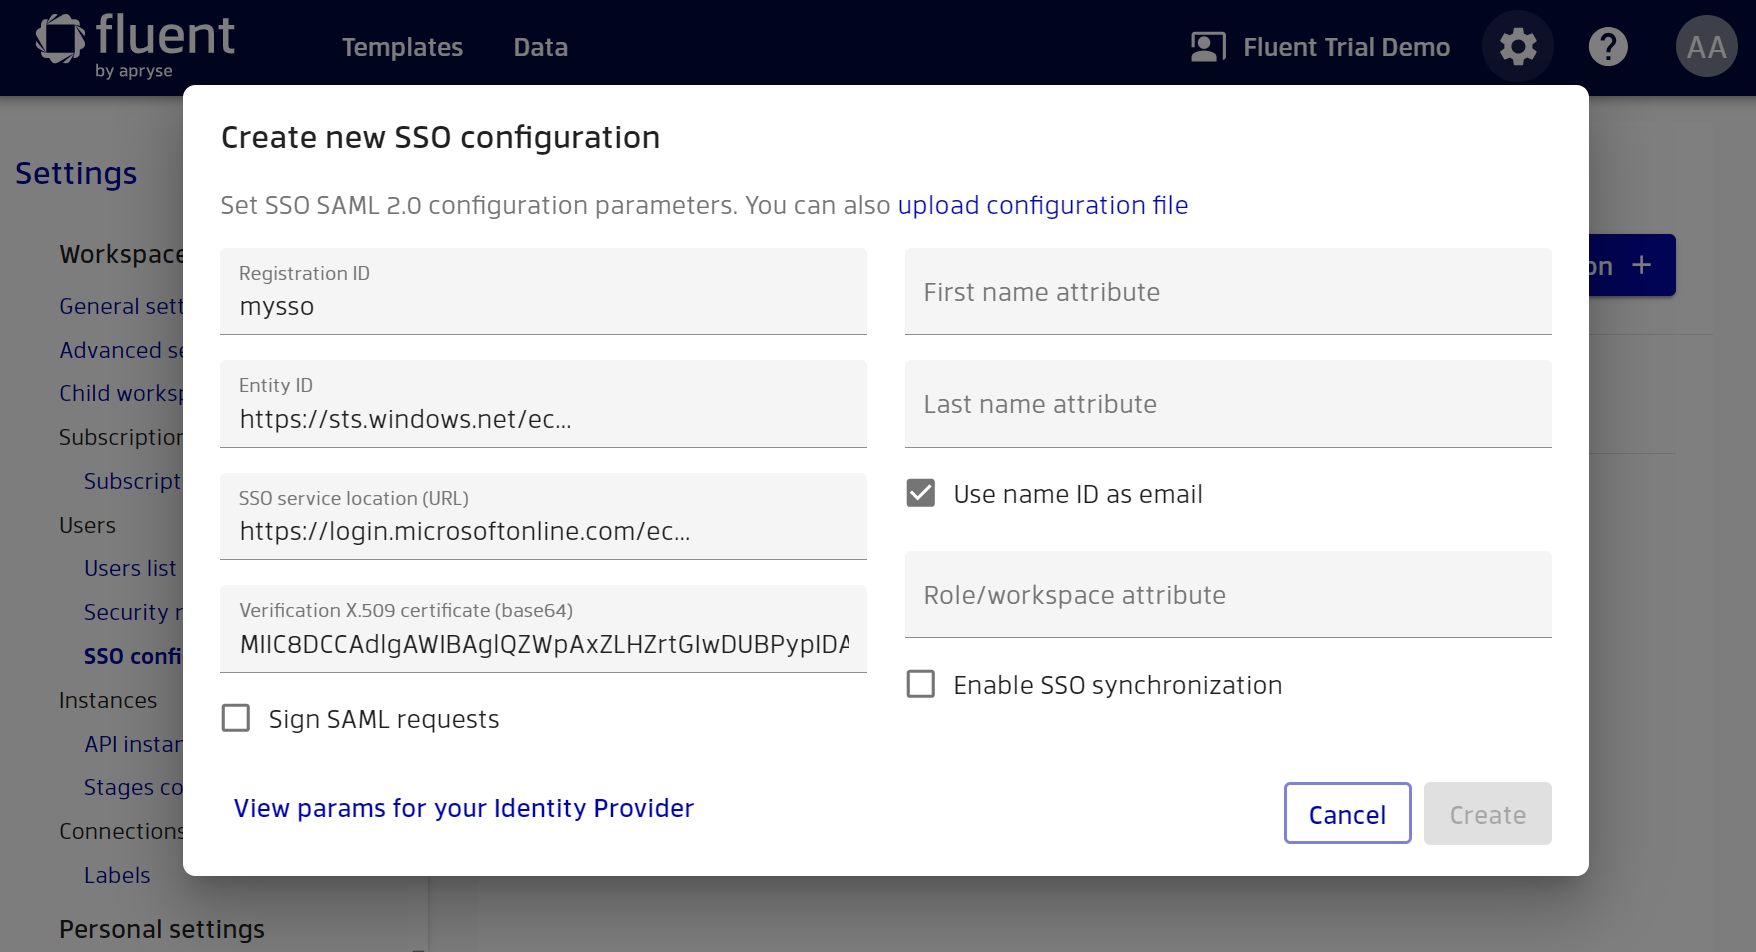
Let's specify the ‘Registration ID’ for our configuration. Registration ID is used by Manager to differentiate between SSO configurations. Essentially this is just the name of the SSO provider.
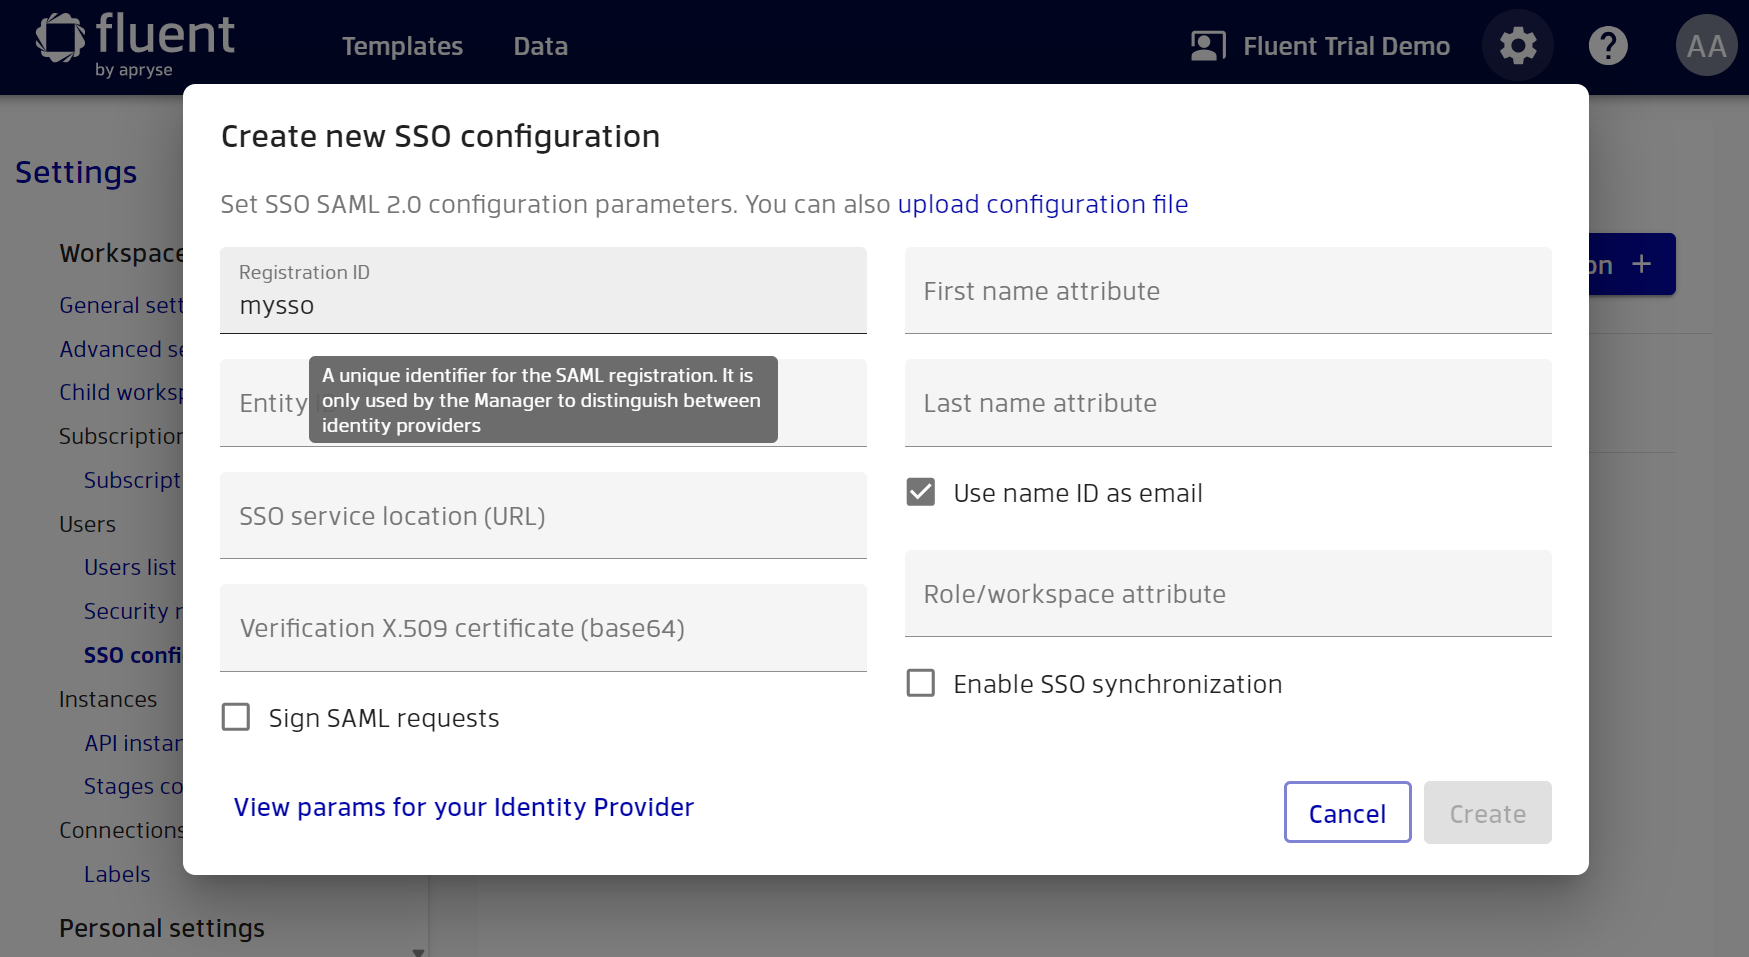
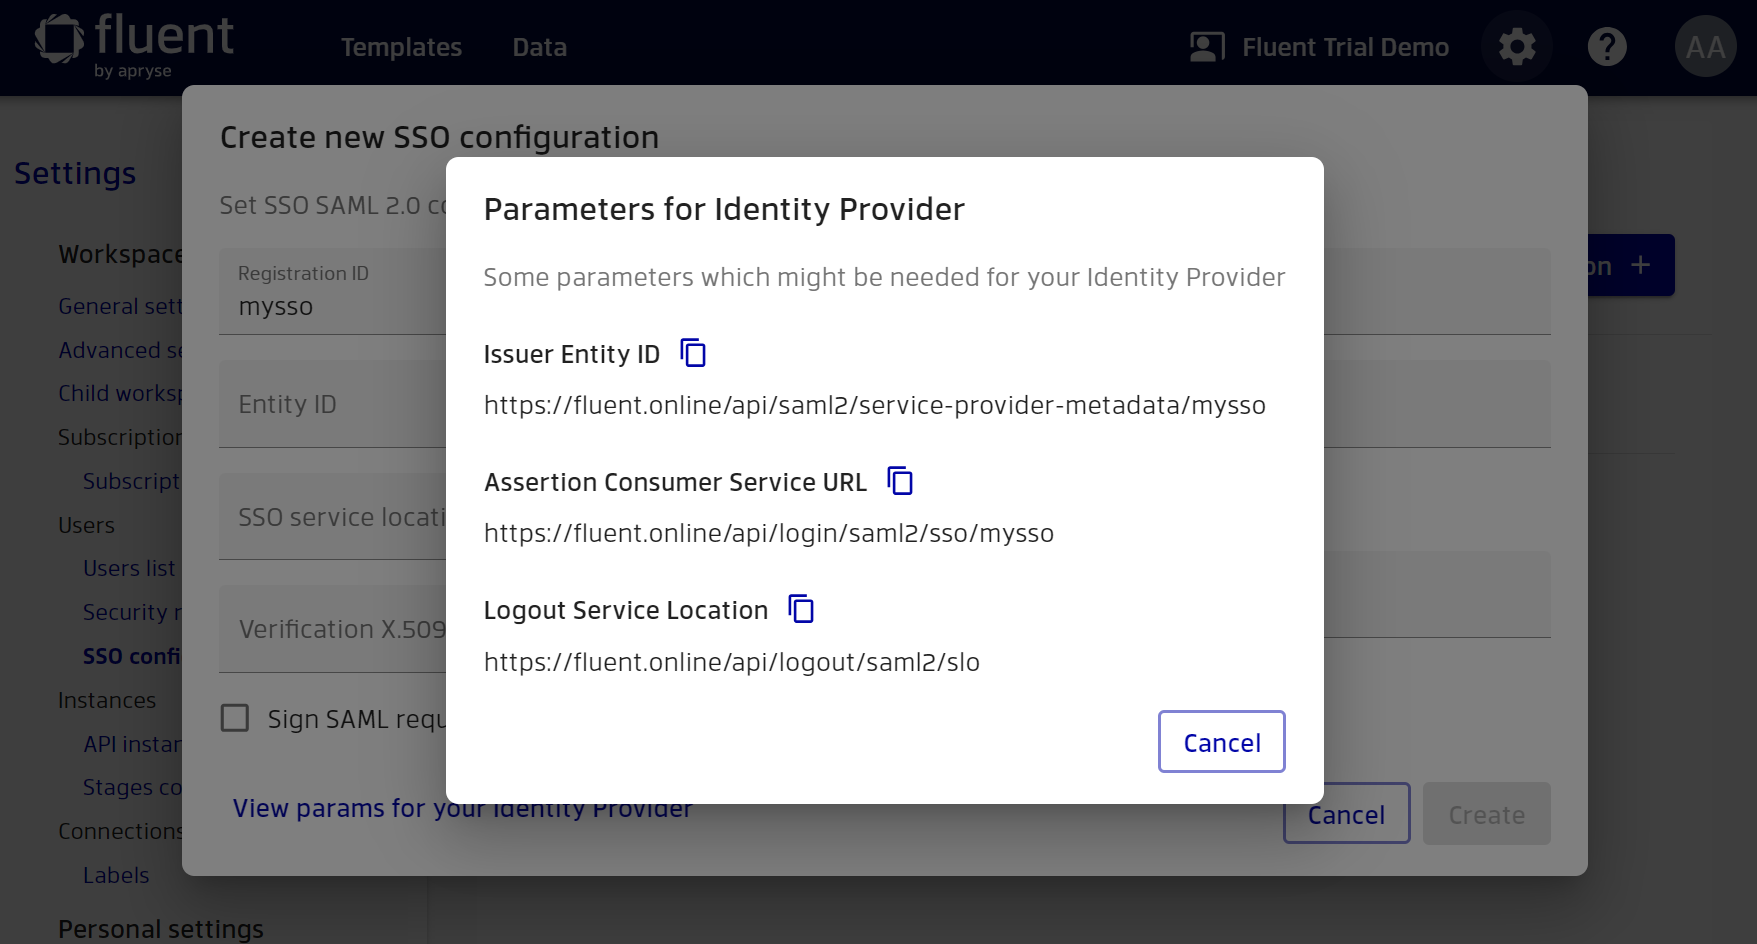
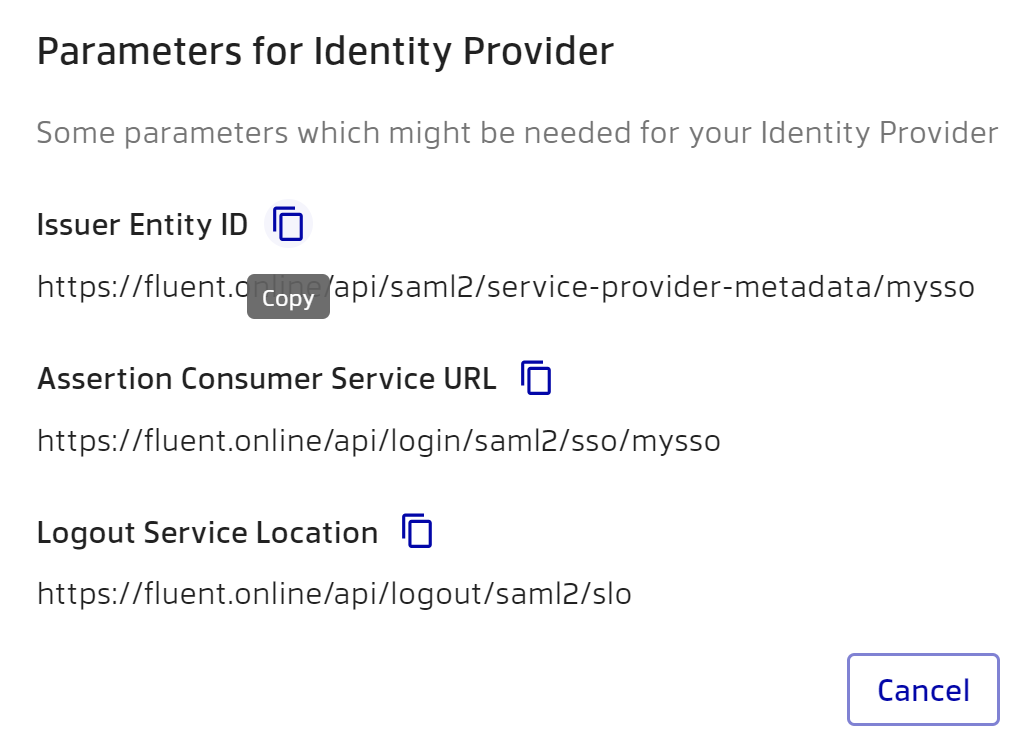
Once you have entered the Registration ID, you can now view the Manager options that you may need when configuring your Identity Provider. Click ‘View params for your Identity Provider’.
Further configuration depends on the SSO provider you choose. Continue reading the documentation depending on your provider. If your provider is not listed, you can read the documentation for other providers as the process is quite similar.
Using Keycloak as an Identity Provider for Manager
Now we need to configure Keycloak to communicate with the Manager application. To do this, we need to go to the ‘Clients’, where we can do the necessary configuration.

Click the ‘Create client’ button. You will be presented with General Settings, where you can specify the basic settings necessary for proper communication with Manager. Specify the ‘Client type’ as SAML and the ‘Name’ as Fluent Manager. The ‘Client ID’ value can be copied directly from Manager by clicking the copy button next to the ‘Issuer Entity ID’.

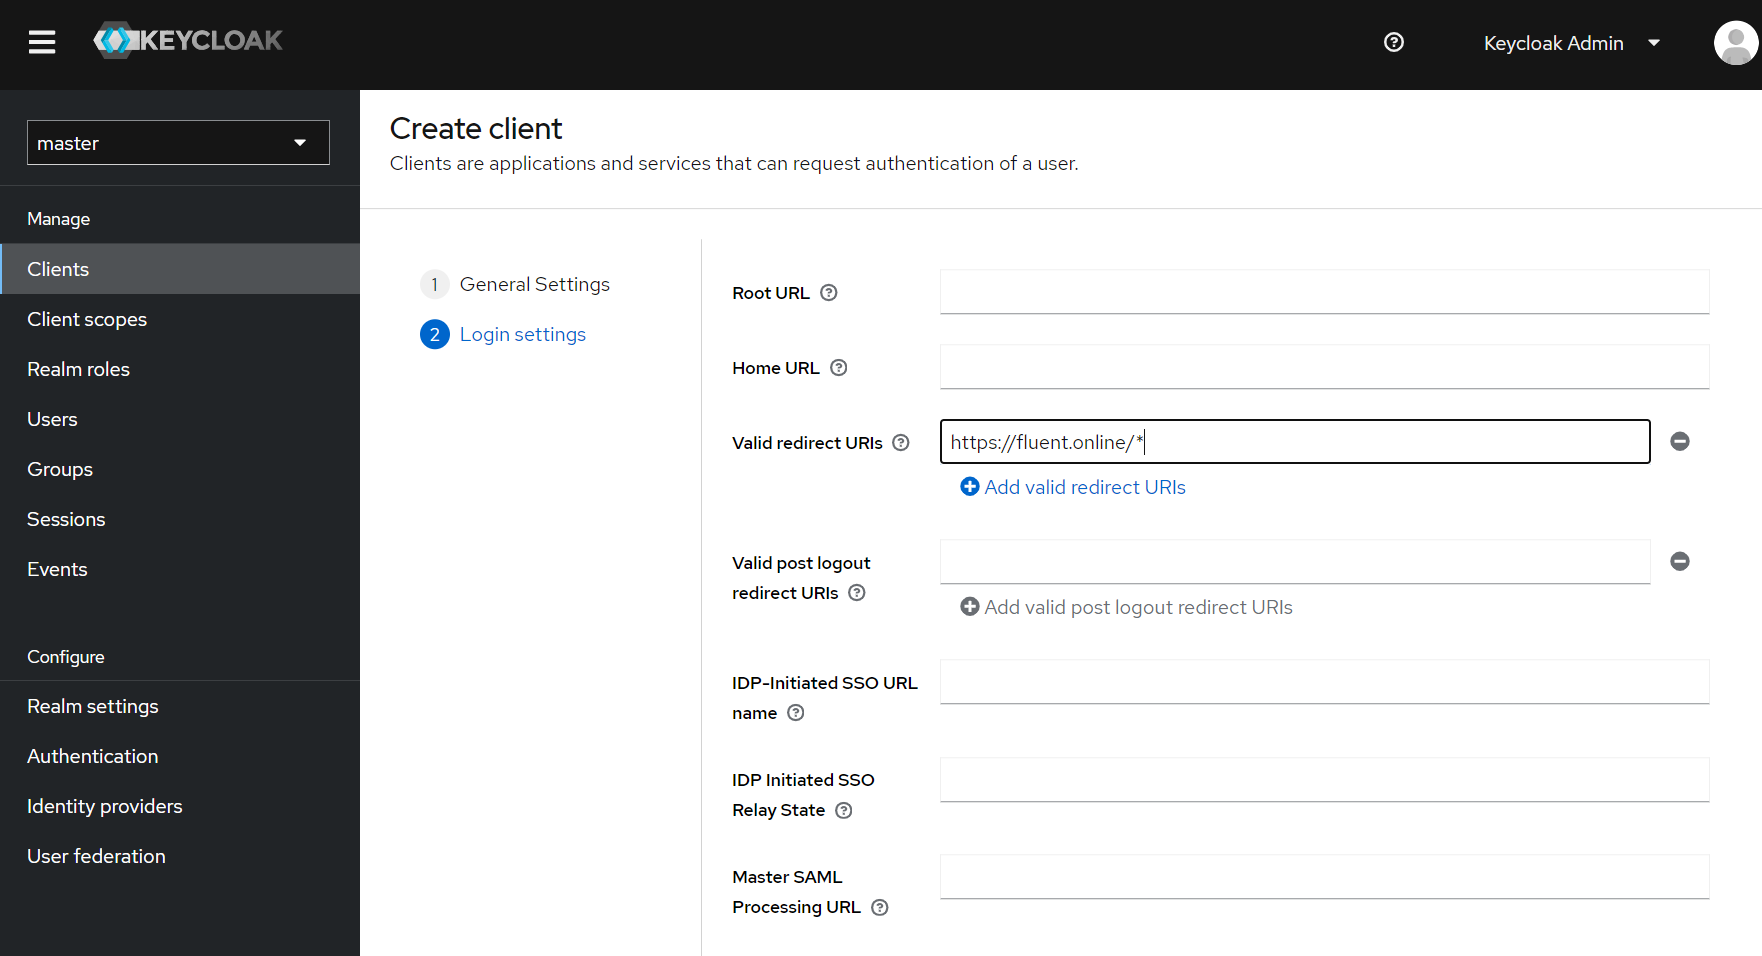
After that, click the ‘Next’ button. Now you can configure ‘Login settings’. All you need to provide here are ‘Valid redirect URIs’. You can set the value of this field to http(s)://{fluent-manager-domain}/*, so that Keycloak can redirect back to the application after a successful login.
Now just click the ‘Save’ button. After this you can return to the Manager setup and fill in the options on the Manager side. The value of ‘Entity ID’, ‘Single Sign On Service Location’ and ‘Verification certificate’ can be taken from Keycloak. To find these values, go to ‘Realm Settings’ and click on ‘SAML 2.0 Identity Provider Metadata’. You can also find ‘Logout URL’ in the metadata which we will discuss later.


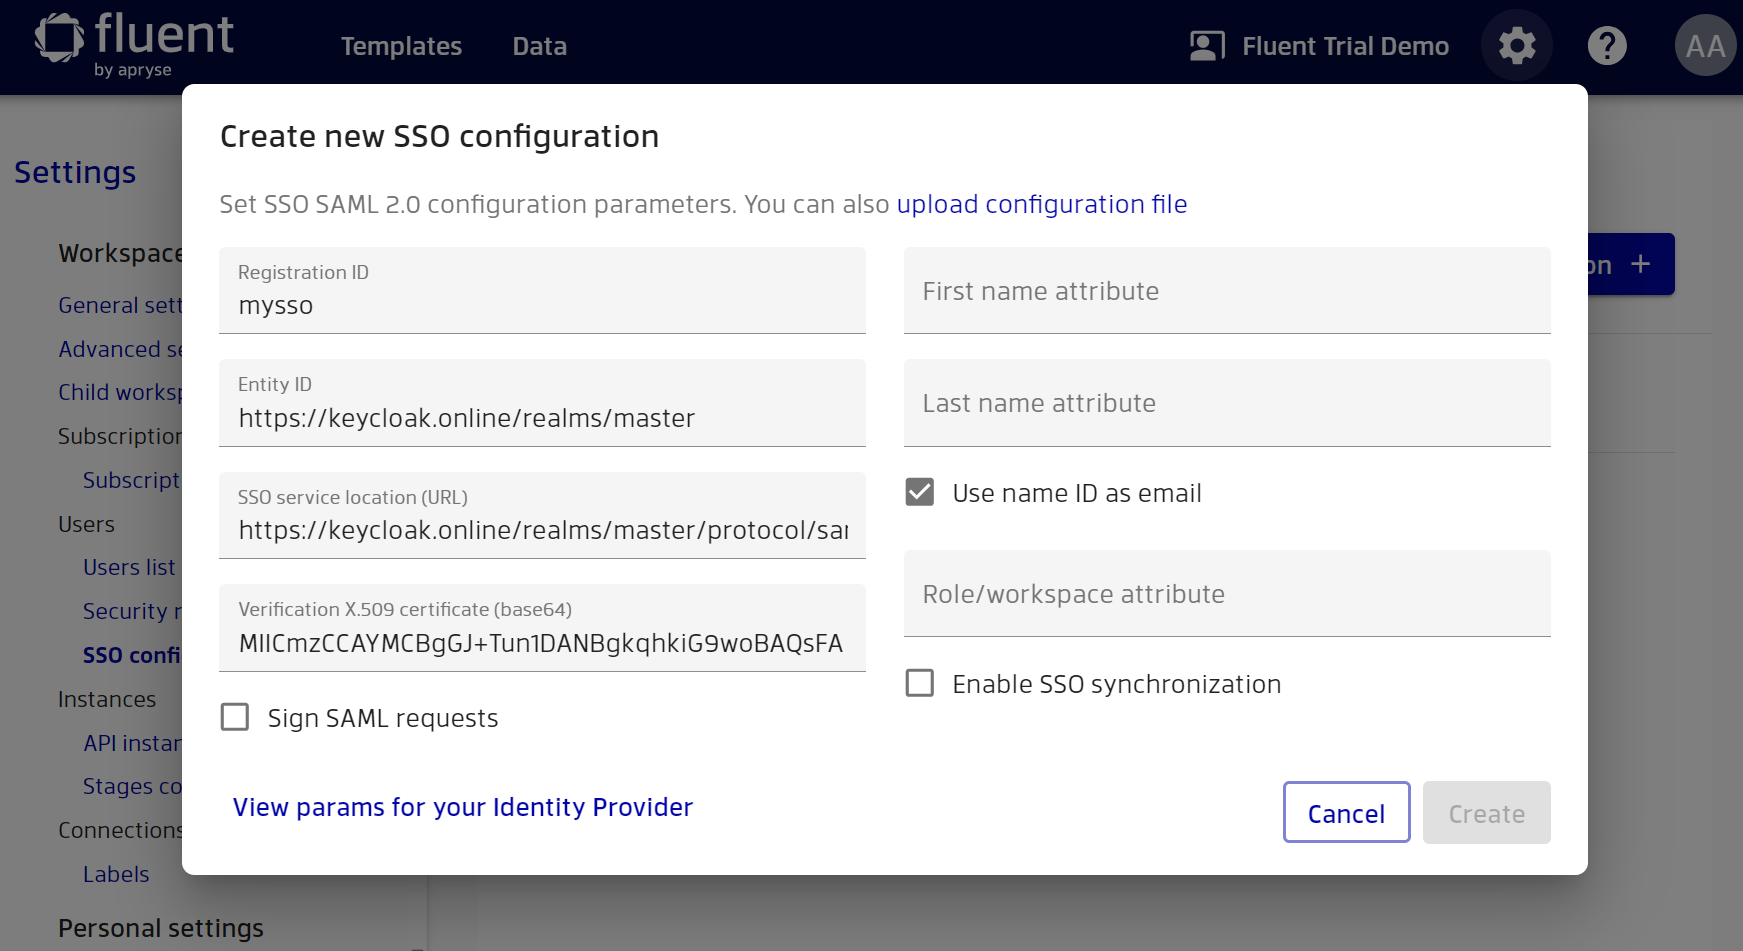
After copying the values, the configuration on Manager will look like this.
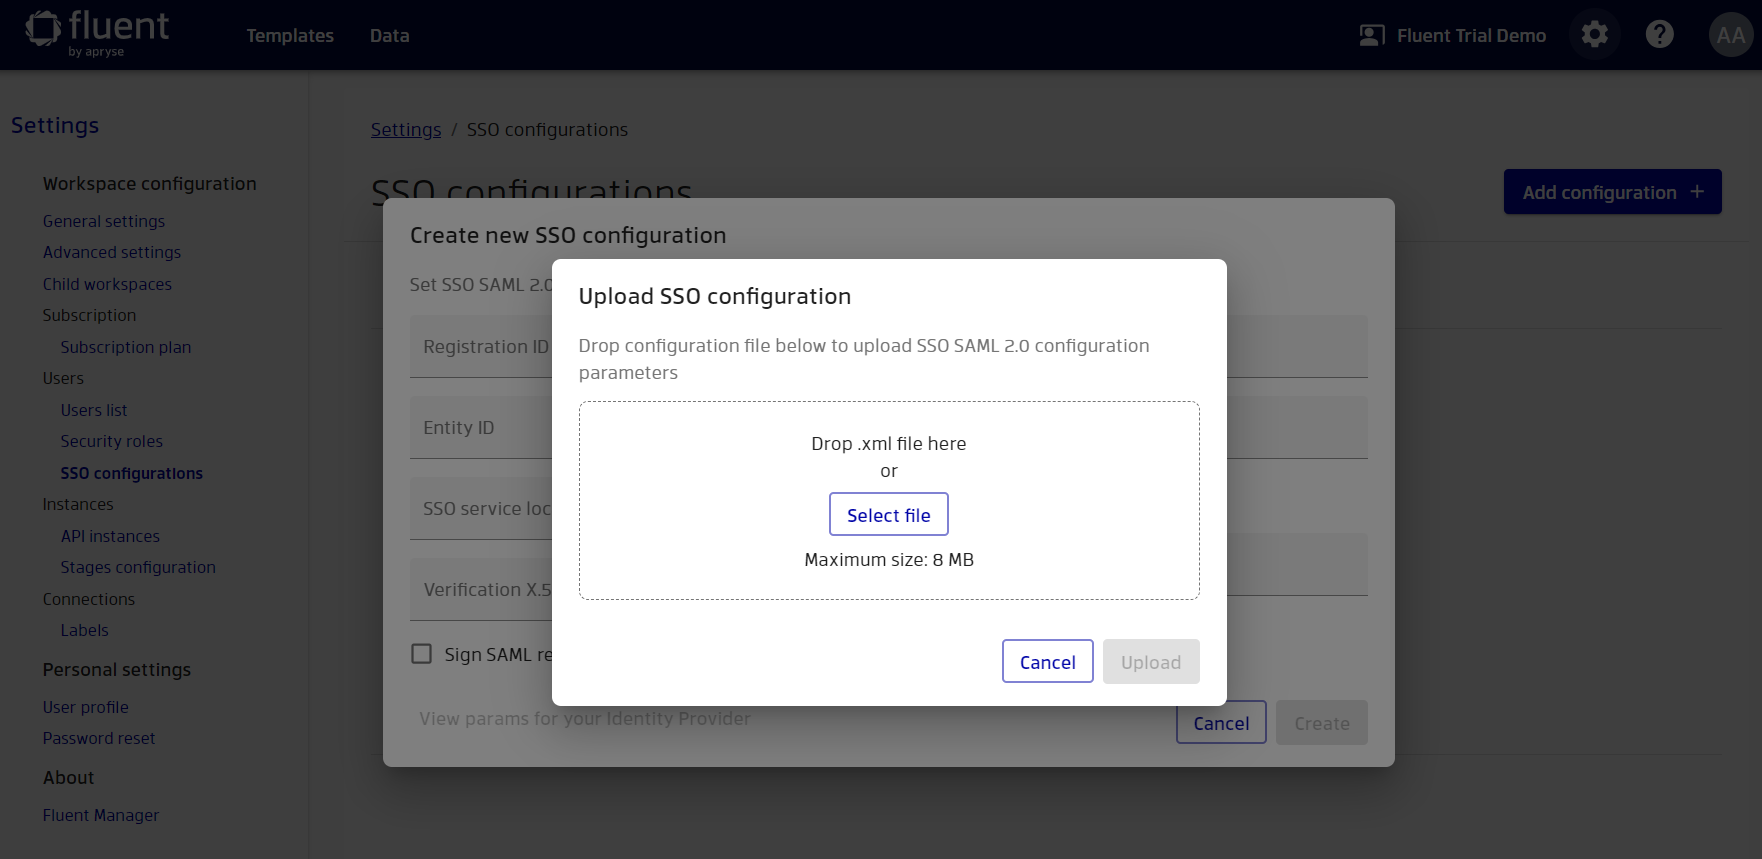
Also, instead of manually copying the necessary attributes, you can simply upload the metadata file to Manager.
By default, Keycloak requires its clients to sign requests. You can generate the certificate and key directly in Keycloak by going to ‘Clients’, selecting Fluent Manager Client and going to ‘Keys’. You will then need to enable the request signing option on Manager and provide the generated certificate and key. To simplify the configuration, we will disable the request signing requirement.

We recommend enabling requests signing in a production environment as this ensures greater security.
When client signing is enabled, it is not necessary to specify the "Logout URL". You can read about this further in the chapter about Single Sign-Out.
The last thing we need to configure for the simplest configuration is information about the attributes from where to get ‘First Name’, ‘Last Name’ and ‘Email’. After successfully setting up SSO, users attempting to log in via SSO will be redirected to Keycloak for login and after successful login, Keycloak will redirect the user back to Fluent Manager. In addition, Keycloak will send user information that is required to create a user on Manager. So we need to configure which attributes Keycloak will send to Manager and which attributes Manager will read information from.
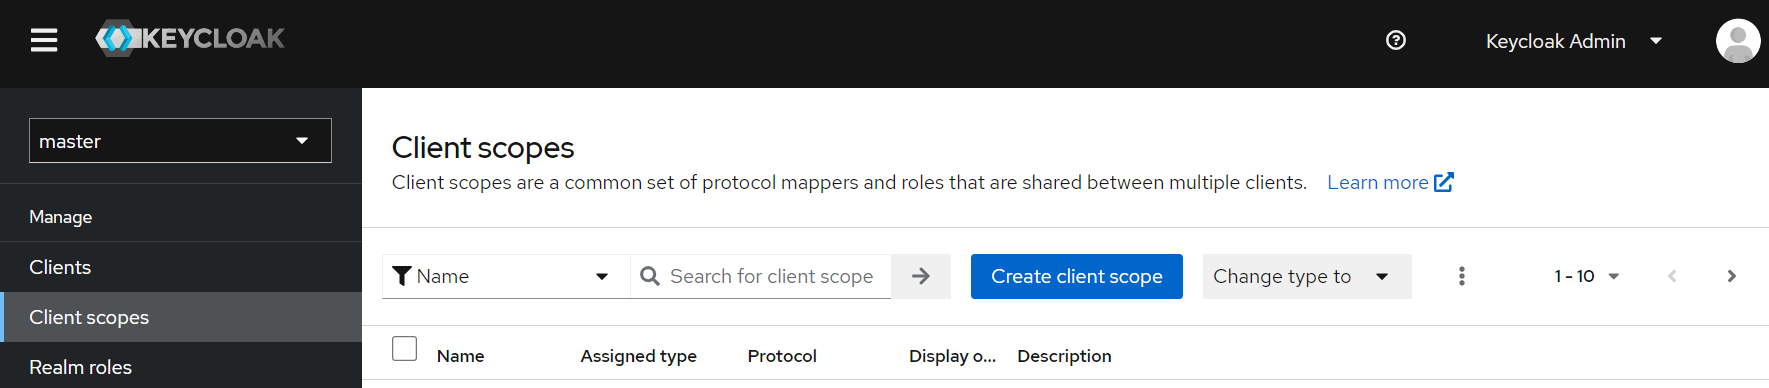
To configure Keycloak to send the necessary attributes, we first need to create a client scope. Go to ‘Client Scopes’.
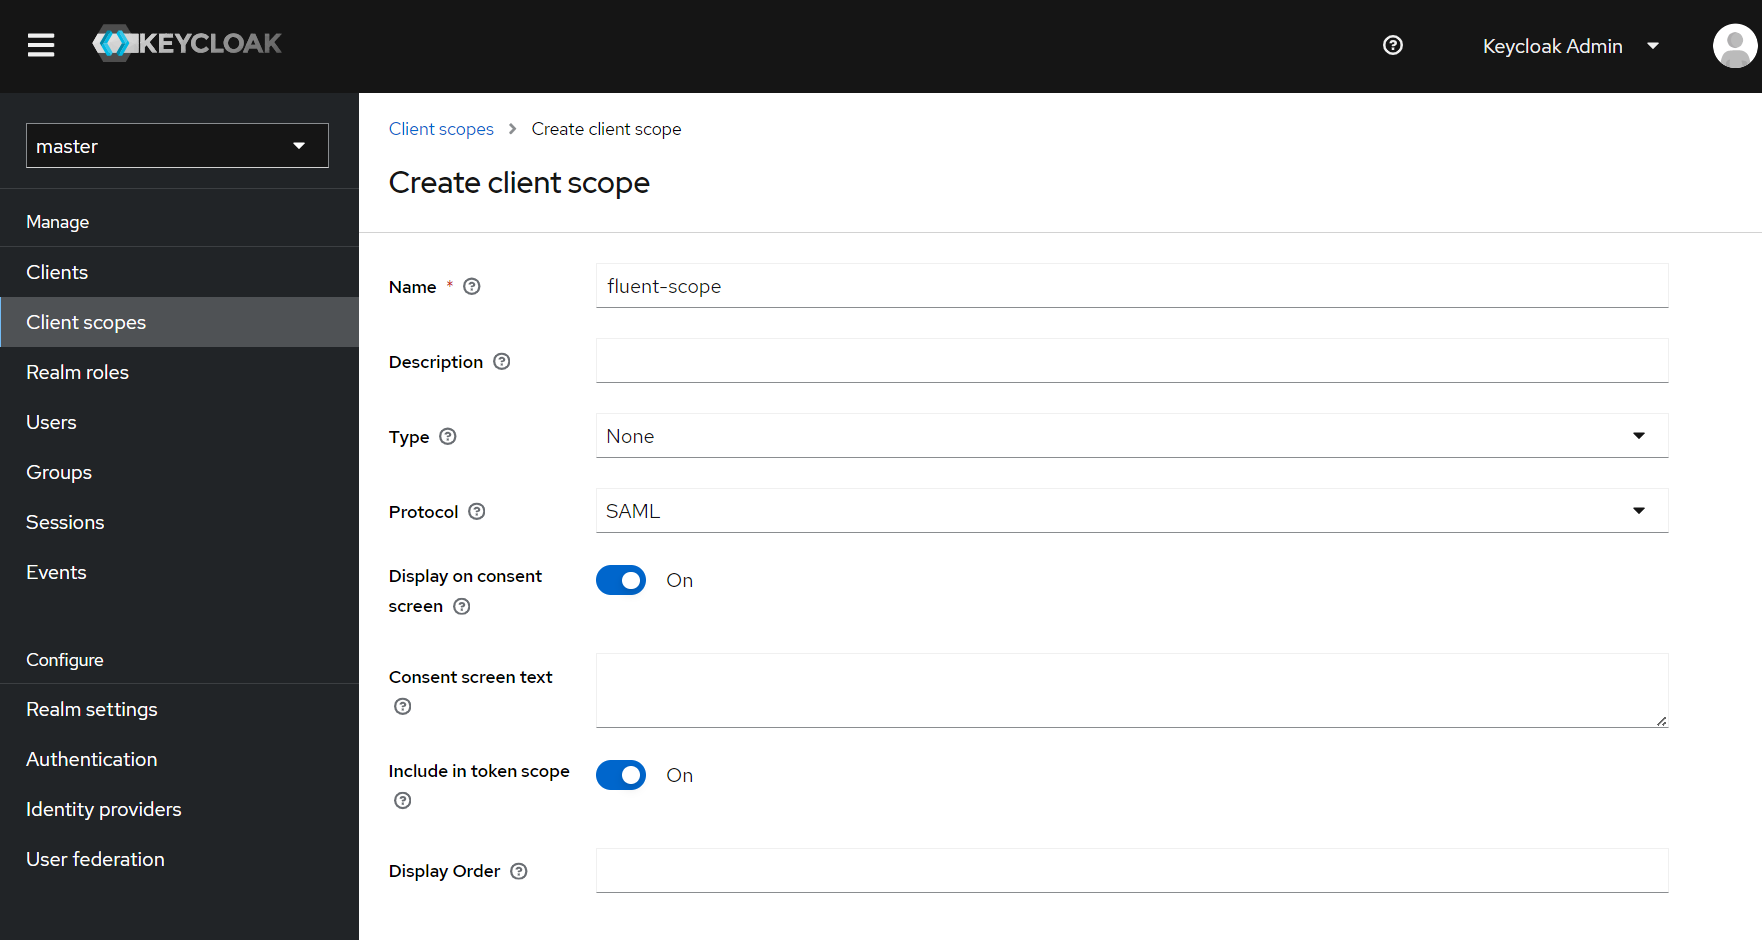
Click the ‘Create client scope’ button. Provide a scope name such as ‘fluent-scope’ and select protocol as ‘SAML’.
Now click save and go to ‘Mappers’ for the freshly baked scope.

Click ‘Configure a new mapper’ and select ‘User Property’ to create a mapper. Set up mappers for first and last names.


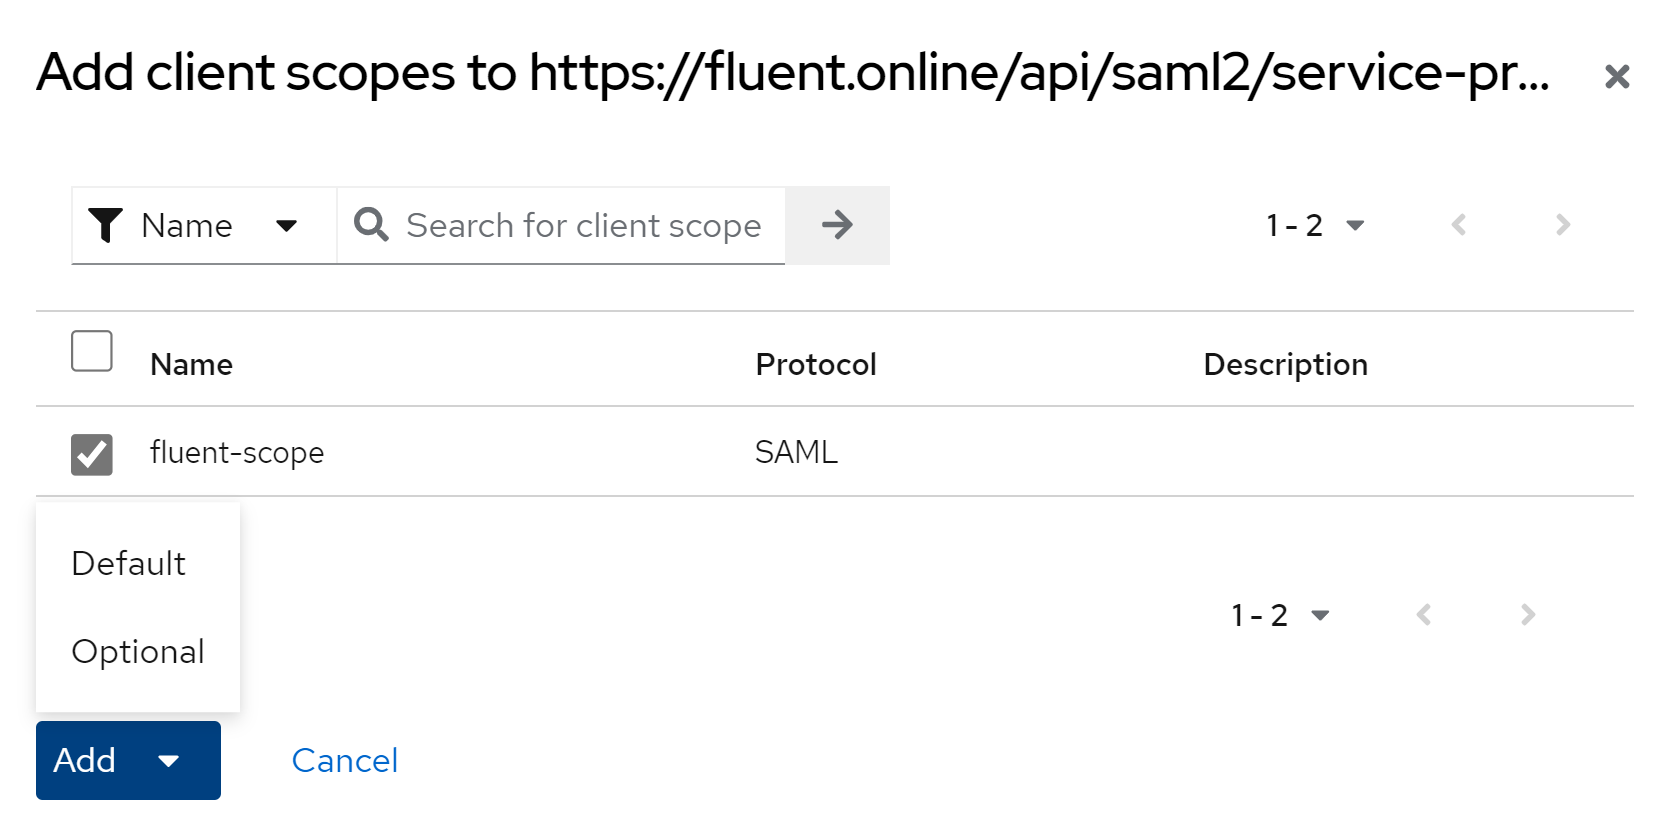
After this, you need to attach the created scope to the client. Go to Client for Manager and select ‘Client scopes’.

Then select the previously created scope, click the ‘Add’ button and select the ‘Default’ option.
Also configure Manager so that it can extract the first and last name from the necessary attributes.

By default, email will be extracted from name ID (username), which is always sent anyway. But if your name ID doesn't have email format, you can clear the ‘Use name ID as email’ checkbox and specify a custom attribute for email. Finally, click the ‘Save’ button.
Congratulations, you have set up your first SSO provider!
Using Microsoft Entra ID as an Identity Provider for Manager
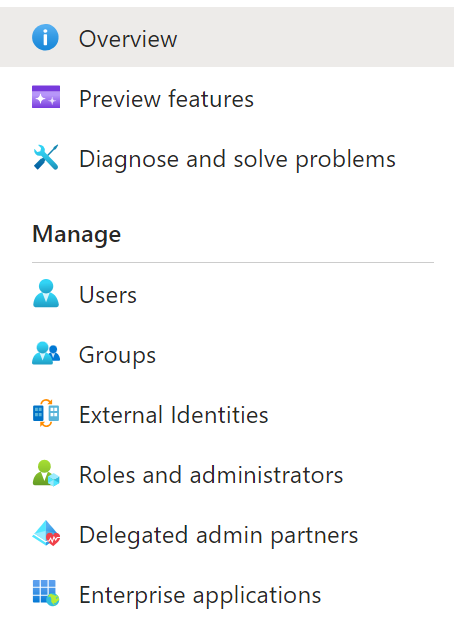
Now we need to configure Microsoft Entra ID to communicate with the Manager application. To do this, go to Microsoft Entra ID and select Enterprise applications on the left panel.
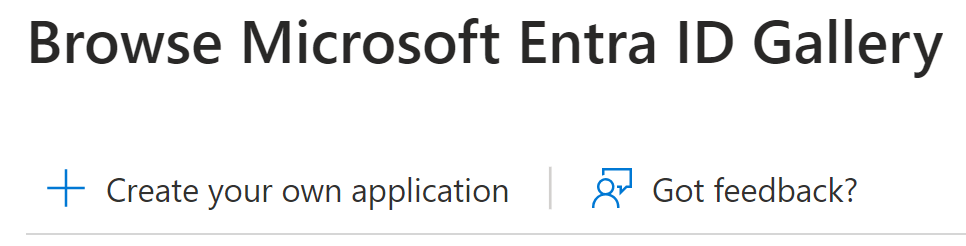
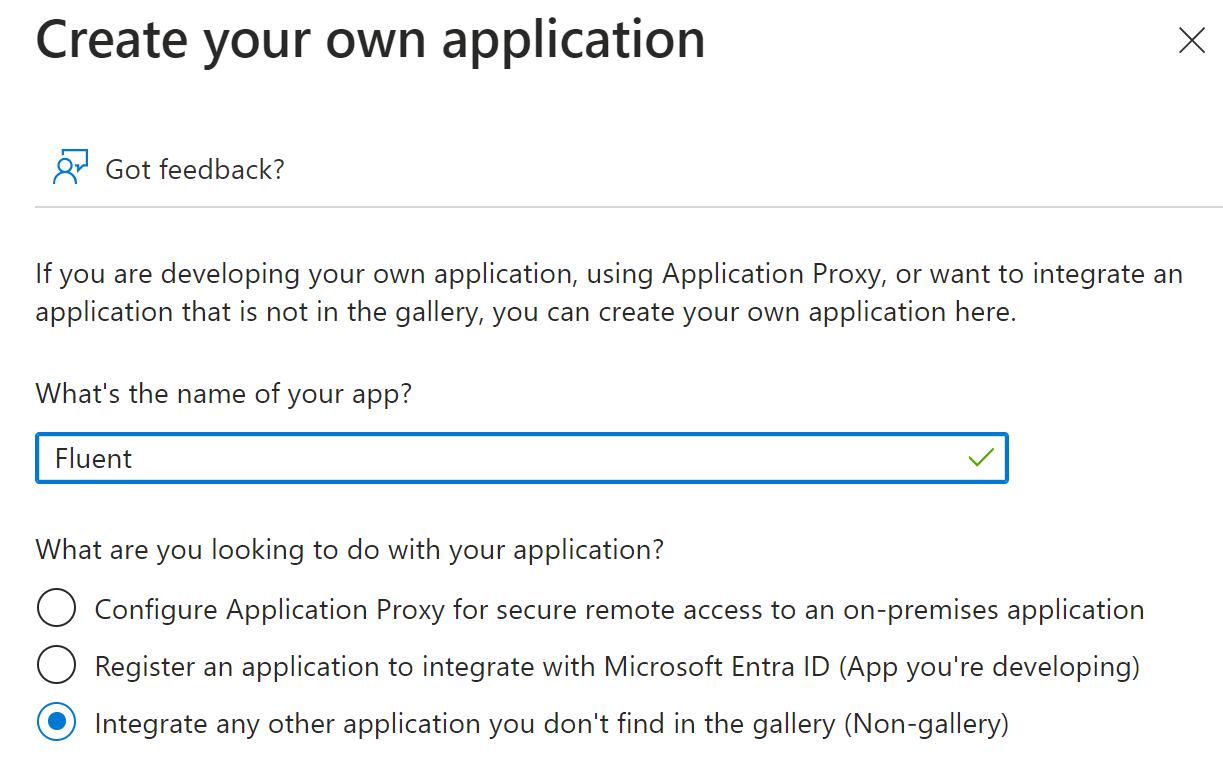
Select ‘New application’ and after that ‘Create your own application’.
Then enter the name of the application, for example as Fluent and leave the option ‘Integrate any other application you don't find in the gallery (Non-gallery)’ and click the ‘Create button’.
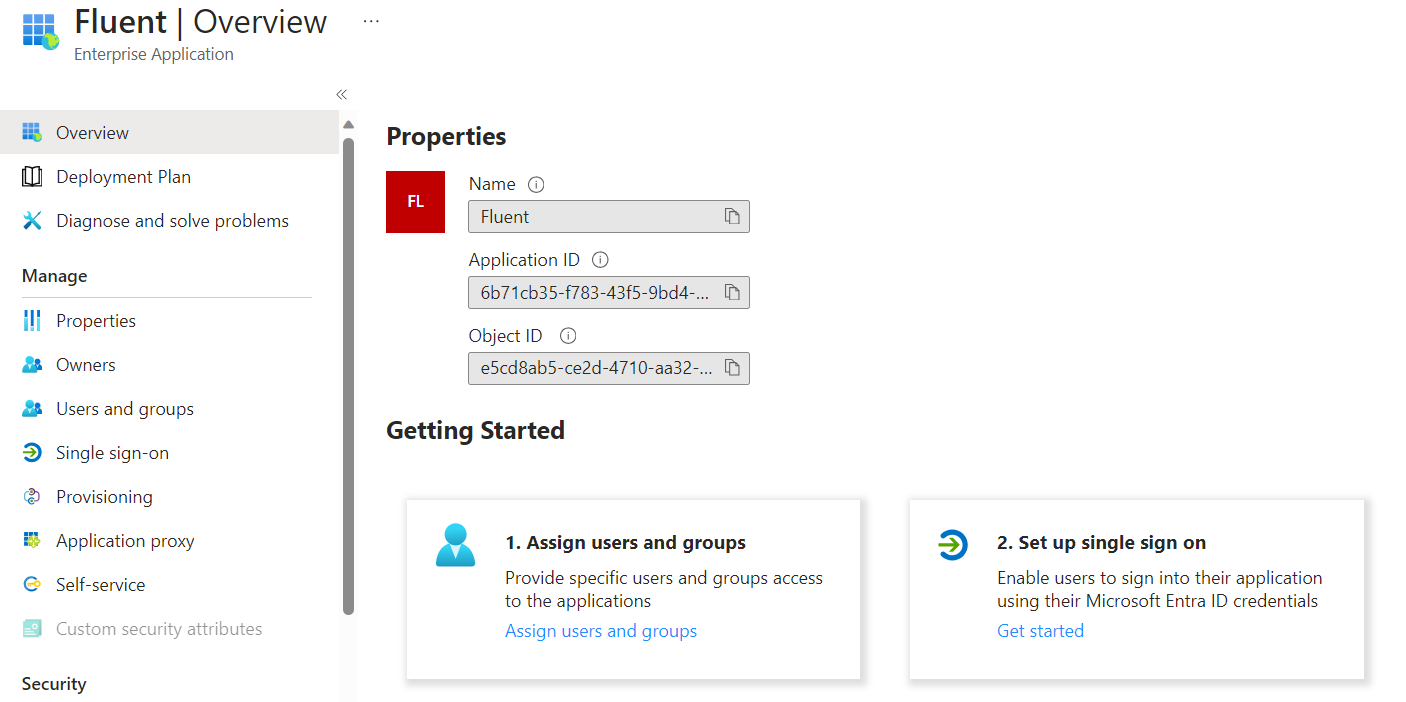
Great, the application is created. Let's now go to the SSO settings by clicking on ‘Set up single sign on’.
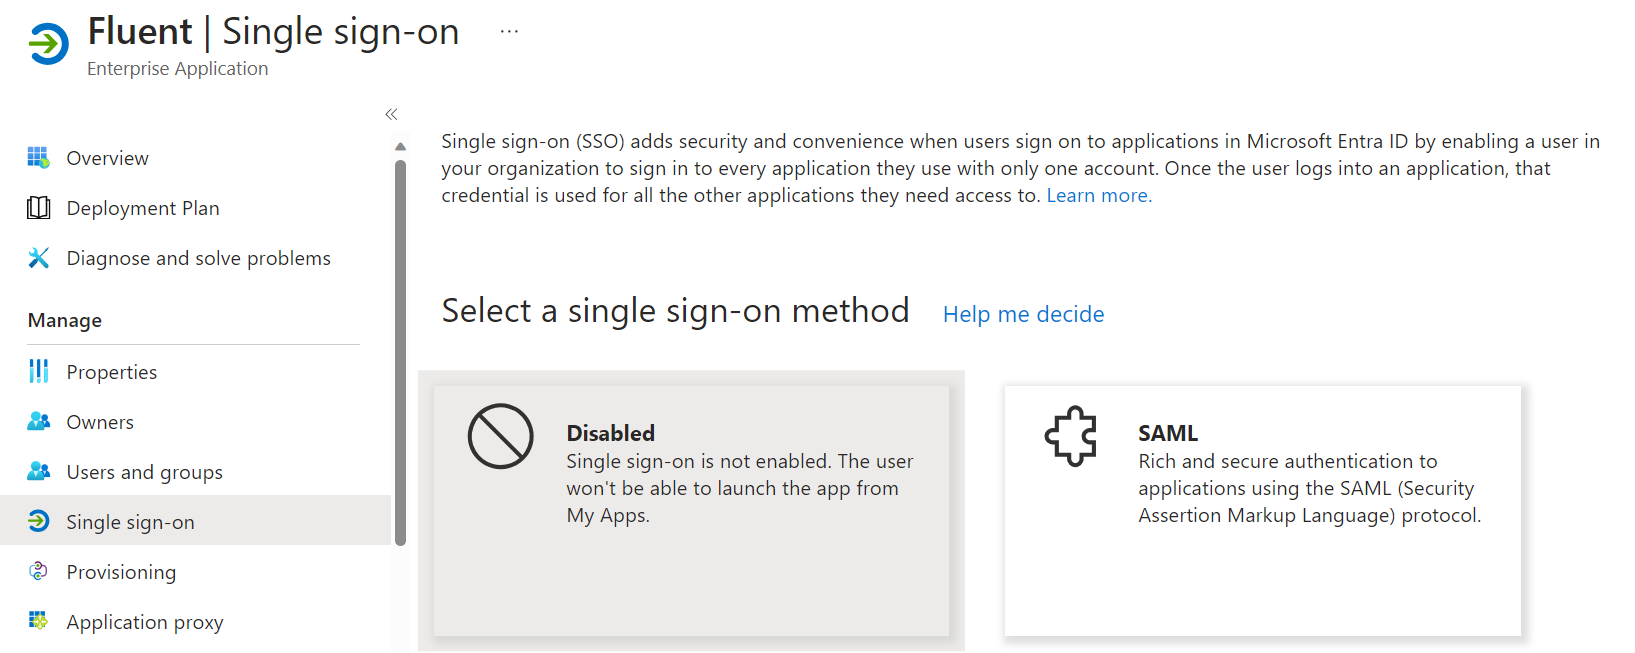
At this step, we need to select the SSO method. Fluent Manager only supports SAML for now, so click on SAML.
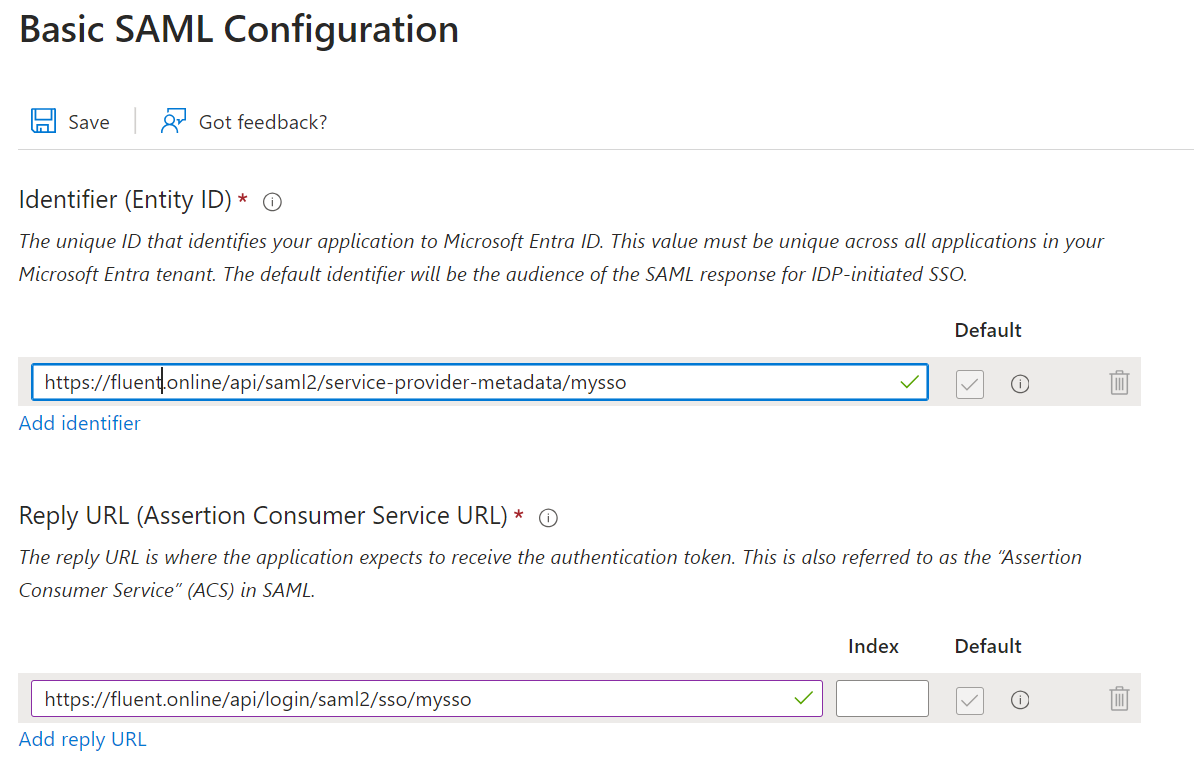
Now we can start setting up our SSO provider. First, you need to configure the Basic SAML Configuration by providing the Entity ID and Assertion Consumer Service URL. These values can be copied directly from Manager.
After specifying the required parameters, save your changes. After this you can return to the Manager setup and fill in the options on the Manager side. The values of ‘Entity ID’ and ‘Single Sign On Service Location’ can be taken from Entra ID. To find these values, go to the 4th step called ‘Set up Fluent’. You can also find the ‘Logout URL’ value here, we will discuss later how to use it.

Here you can copy the parameters required for Manager. Additionally, you can copy the ‘Verification certificate’ in base 64 form in the 3rd step called ‘SAML Certificates’.

After filling in the specified parameters in Manager, the configuration looks like this.
Also, instead of manually copying the necessary attributes, you can simply upload the metadata file to Manager.
By default, Entra ID doesn't require for Manager to sign the request. To simplify the configuration we will leave this behavior. If you enable requests signing, you will then need to enable the request signing option on Manager and provide the generated certificate and key.
We recommend enabling requests signing in a production environment as this ensures greater security.
When client signing is enabled, it is not necessary to specify the "Logout URL". You can read about this further in the chapter about Single Sign-Out.
The last thing we need to configure for the simplest configuration is information about the attributes from where to get ‘First Name’, ‘Last Name’ and ‘Email’. After successfully setting up SSO, users attempting to log in via SSO will be redirected to Entra ID for login and after successful login, Entra ID will redirect the user back to Fluent Manager. In addition, Entra ID will send user information that is required to create a user on Manager. So we need to configure which attributes Entra ID will send to Manager and which attributes Manager will read information from.
Entra ID is configured by default so that it will send all the necessary information. The only thing we recommend is to remove namespace from the attributes for shorter names. To do this, go to the second step called ‘Attributes & Claims’ and click edit.
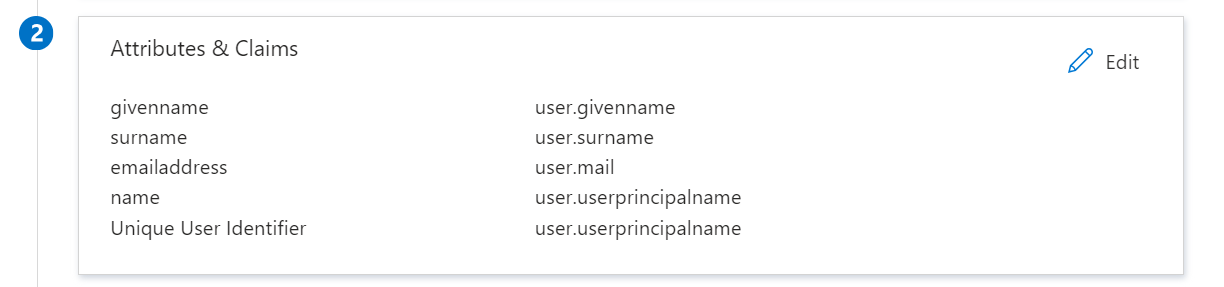
After that, go to the attributes for first and last name and delete namespace.
![]()
After that, all we have to do is specify the attribute names for Manager. To see these names, go to the second step called ‘Attributes & Claims’.
Copy the values for first and last name and paste them into Manager.

By default, email will be extracted from name ID (username), which is always sent anyway. But if your name ID doesn't have email format, you can clear the ‘Use name ID as email’ checkbox and specify a custom attribute for email. Finally, click the ‘Save’ button.
Congratulations, you have set up your first SSO provider!
Testing your SSO provider
Once you have configured at least one SSO provider, you can test it. If you do not yet have users on the SSO provider side, then you can create them for testing. Note that they must have previously configured attributes for email, first name and last name. Also, some providers explicitly require users to have permissions to access the application. For example, in the case of Entra ID, you need to go to your application, select ‘Users and groups’ and add the necessary users or an entire group to the application.
Return to the login page by logging out.
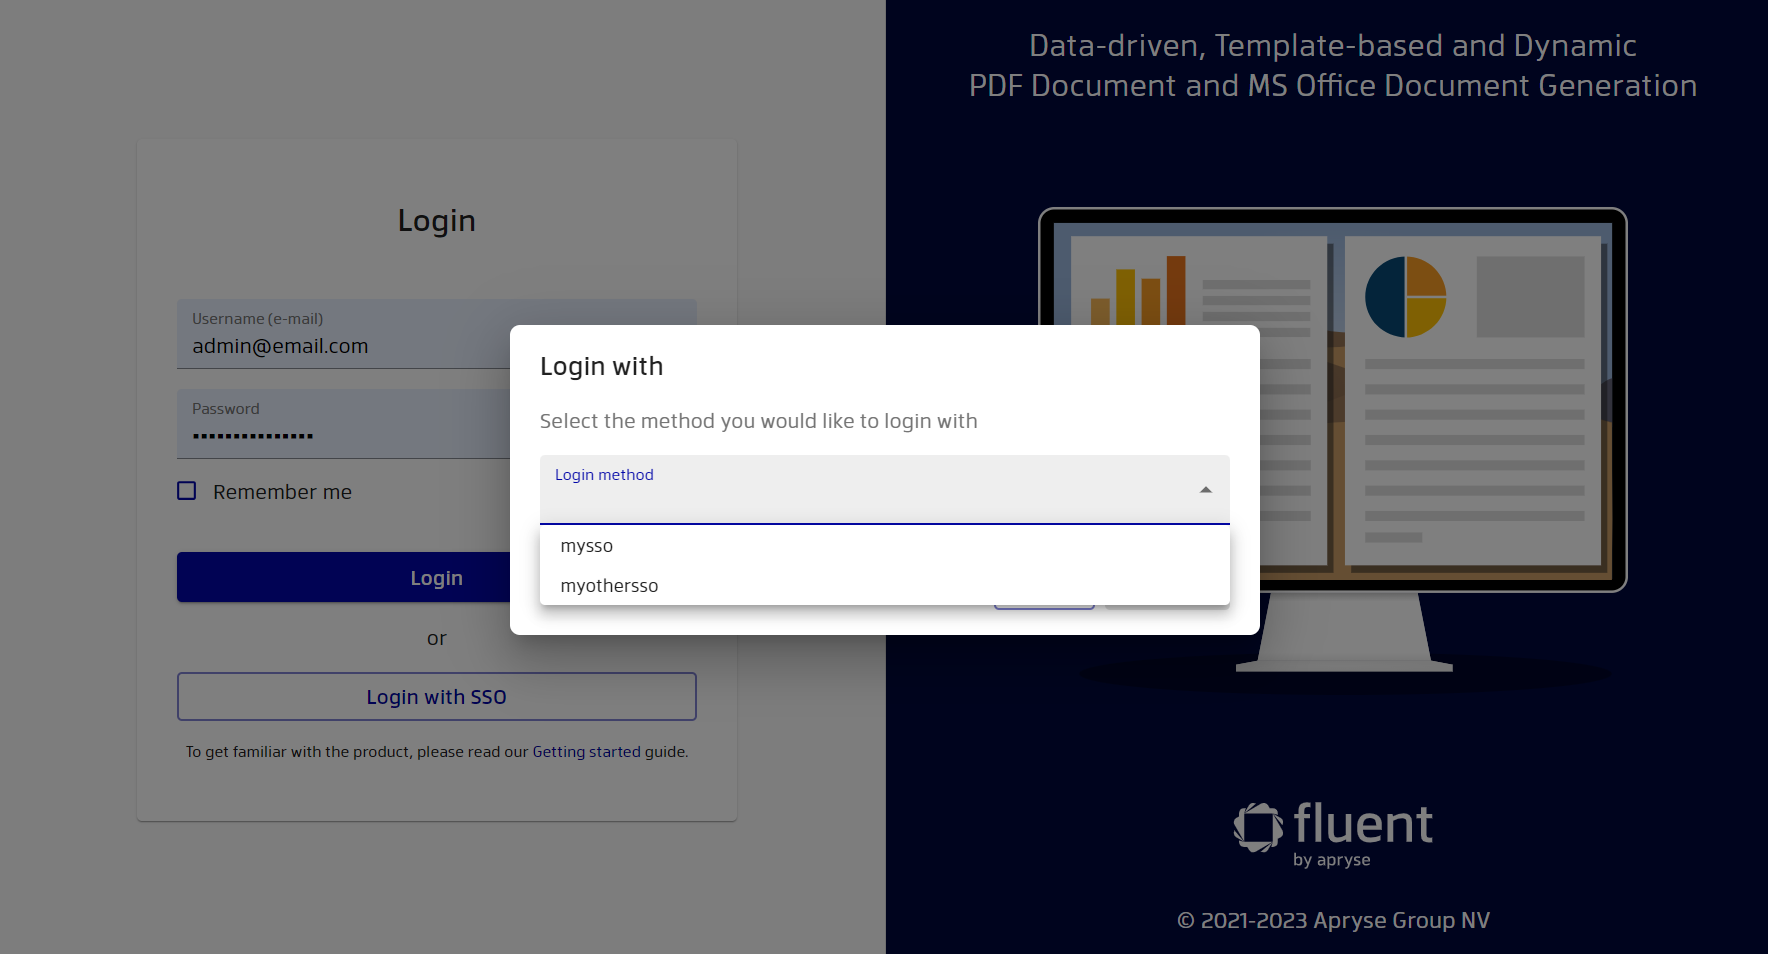
You should now have the ‘Login with SSO’ button. Click this button. If you have one SSO provider, then you should be redirected to your only provider automatically. If you have several providers, then you can select the required provider, as shown in the screenshot.
With the correct configuration you will be redirected to your SSO provider and after successful login you will be redirected back to Manager.
If your configuration is incorrect, you may encounter various errors. To resolve these errors, double-check your configuration and examine the Manager backend logs. If Manager fails to redirect you to the SSO provider, it may be due to a problem with the SSO configuration or an incorrectly specified ‘Entity ID’ or ‘SSO Service Location’. If the SSO provider requires request signing, an incorrectly configured certificate and key can also lead to problems with redirection. If you encounter a problem with redirection back to Manager, there may again be a problem with the SSO configuration, or the verification certificate and user attributes specified incorrectly on the Manager.
Setting up workspace and roles for SSO users
By default, users who log in via SSO are assigned the Template Designer role in the primary workspace. However, Manager allows you to flexibly configure which role in which workspace to assign to a new SSO user. This determination of user permissions also occurs based on attributes sent by the SSO provider. We can use the value of any attribute to define a role. For example, this could be the user's group, role, department, and so on.
Let's configure Manager to rely on group attributes to assign workspaces and roles. Go to your SSO configuration on the Manager side and specify role/workspace as group.
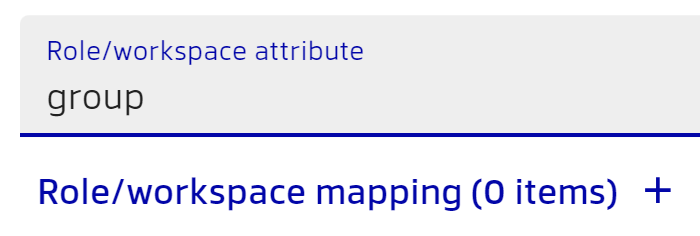
After this you will be able to configure Mapping. Go to the mapping configuration. Here you can configure mapping to add a workspace and role to the user based on the value of the selected attribute. For example, in the following screenshot, we say that if the user has a Basic group, then this user will be assigned to a workspace named Root with the Template Designer role, and if the group is Admins, then the user will be assigned to a Child workspace with the Administrator role.

With this configuration, if the users belong to both groups, they will have access to two workspaces with the specified roles. If the users do not belong to more than one group, then they will get Template Designer role in the primary workspace.
Please note that the group and workspace are assigned only when the user first logs into the application. On subsequent logins, users will have access to the workspaces and roles that they got during the first login.
In addition to the configuration on the Manager side, we also need to configure the SSO provider to send the required attribute. In our case this is a group. On the Keycloak side, this can be done by going to the previously created scope and adding a mapper of type group list with the name group. On Entra ID you can go to attributes and claims settings and add group claim. It is also important that Entra ID passes the value of the configured group attribute not as the group name, but as its object id, so when setting up mapping you need to specify the object id value.
How to configure Single Sign-Out
Manager also supports Single Sign-Out. This is a feature that allows users to log out from the Identity Provider during logout on the Manager side.
To configure Single Sign-Out you need to specify the "Logout URL", which can only be specified when the "Sign SAML requests" option is enabled. The "Logout URL" value is usually equal to the "SSO Service Location" value. You can check the value on the Identity Provider side, as described earlier.
After specifying the "Logout URL", the configuration will look like this.

Some identity providers also allow IDP initiated Sign-Out. This can be useful when you need to implement the following workflows:
- When users log out on the IDP side, they will also be logged out in Manager
- The administrator can log out the user on the IDP side, and thus the user will also be logged out in Manager
- When logging out from Manager, you want to log out not only from the IDP, but also from other clients configured for Single Sign-Out
At the time of writing this documentation, Keycloak supports IDP initiated Sign-Out, while Azure Entra ID does not yet support this feature.
Configuring IDP initiated Sign-Out for Keycloak
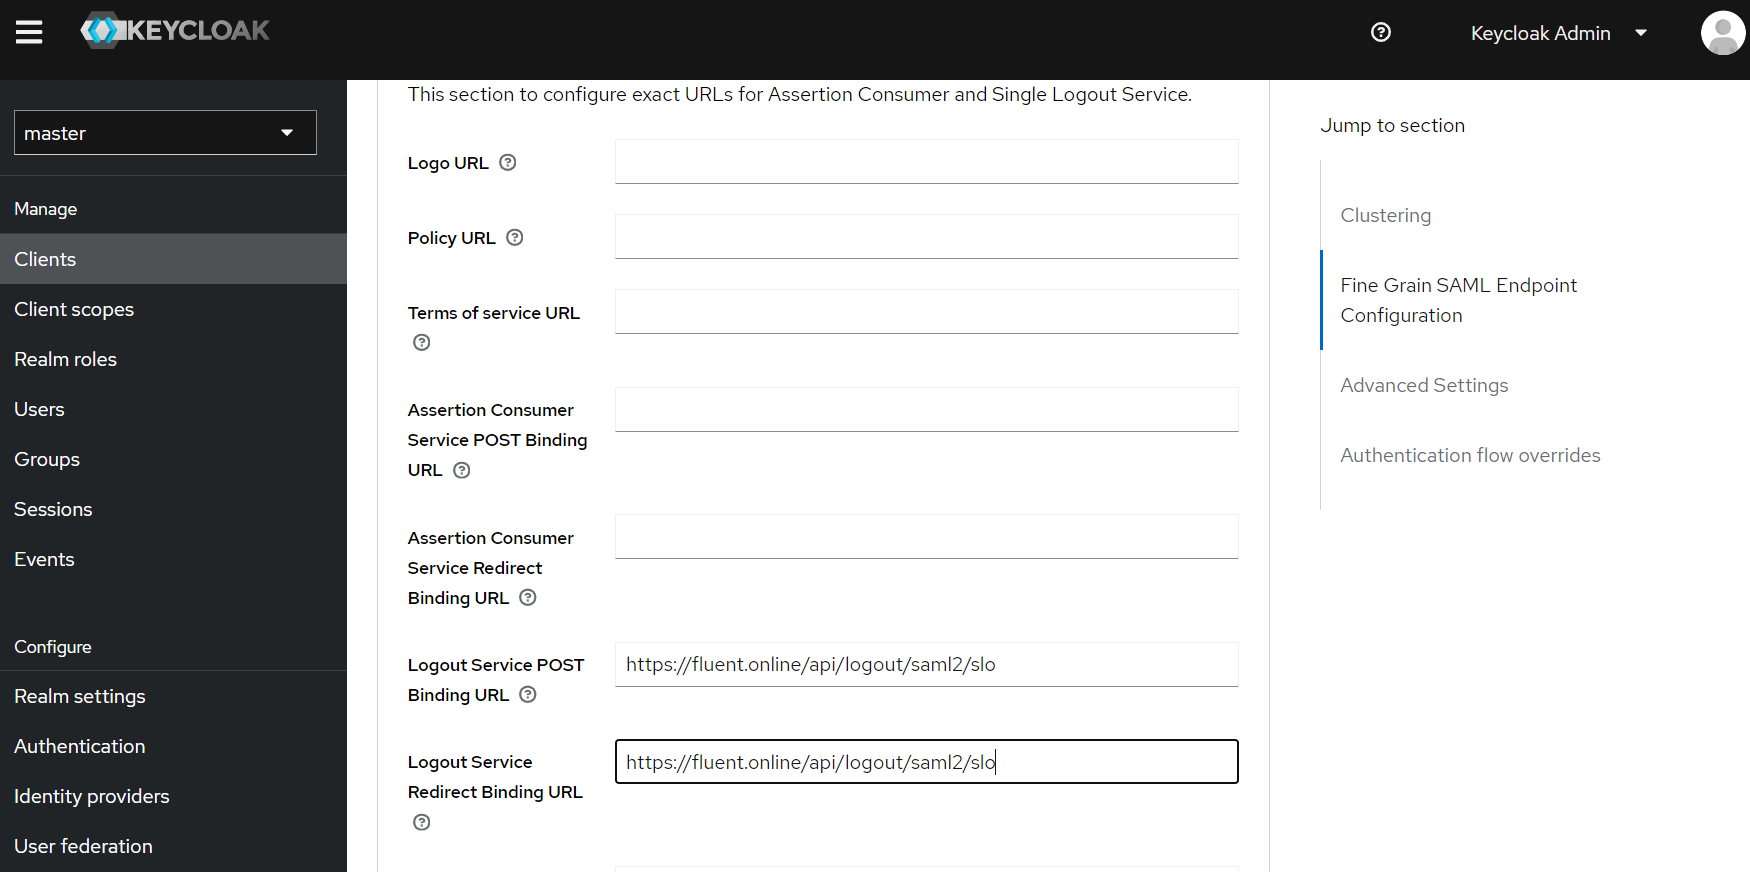
To configure IDP initiated Sign Out on Keycloak you need to go to the client in the "Advanced" tab.

After this you need to provide values for "Logout Service POST Binding URL" and "Logout Service Redirect Binding URL". The value for these parameters can be taken from Manager by copying the "Logout Service Location" parameter.

To check that everything works, you can log into Manager as an SSO user, go to the "Sessions" tab on the client in Keycloak, and invalidate the session.