Creating Tables with Tag Processor 2
In Version 25.1 of Fluent Docs, we’ve introduced a new Tag Processor (Tag Processor 2) as the default Tag Processor for Word templates, which offers more flexibility and power than the original Tag Processor. This article will step you through creating a list of tables that will display customer’s orders, followed by creating an advanced table use case for displaying the orders for a customer and summing the total value of those orders. This is a demonstration of how foreach tags can be used with the new Tag Processor 2.
Looping Tables
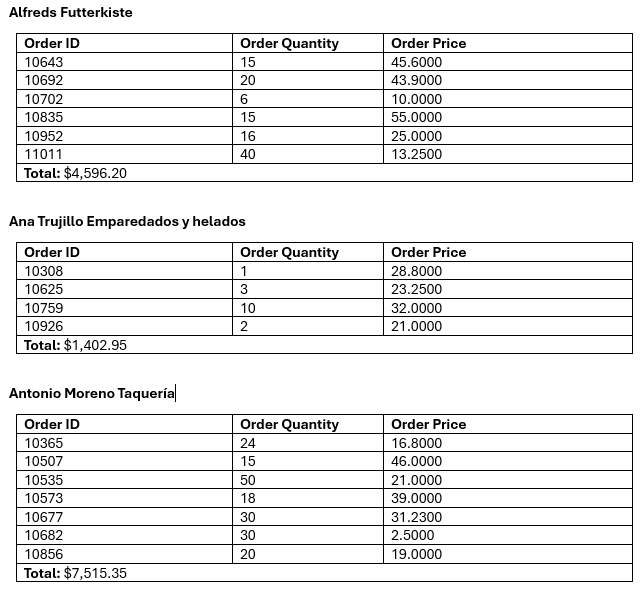
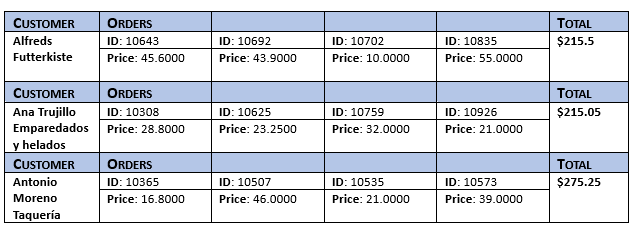
Here is what the generated tables will look like:
Prerequisite: You need to be connected to a datasource. The one we will be using is the SouthWind.xml sample datasource that can be found here: http://xml.windward.net/southwind.xml
Legacy Outer Foreach Setup
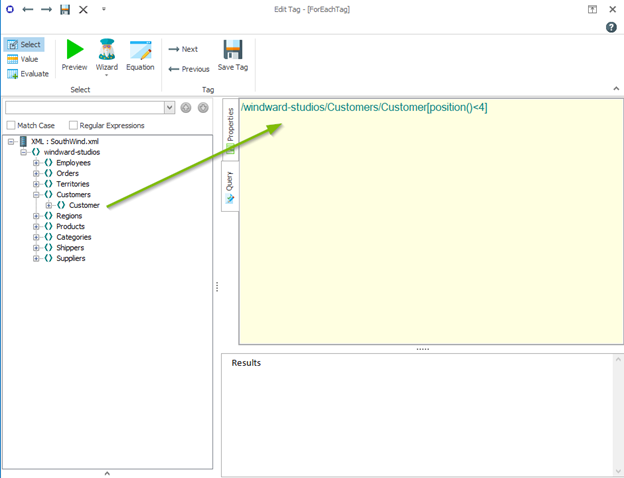
To begin we will create a foreach group that is responsible for looping over each customer. We will use this outer loop as the anchor for creating the inner table that will display the orders. To start, create a Foreach Tag. In the Foreach Tag, select the Customer node from the sidebar. I’ve put “[position() < 4]” at the end of the select to limit the output to 3 customers.
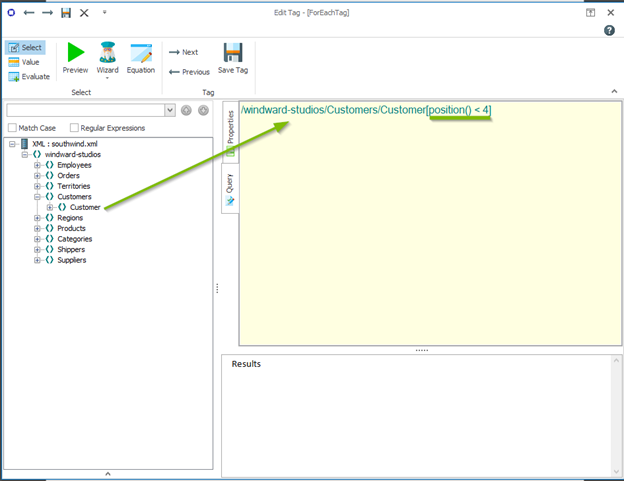
In the properties tab, I’ve also given the tag the nickname of “Customer” to make the readability easier.
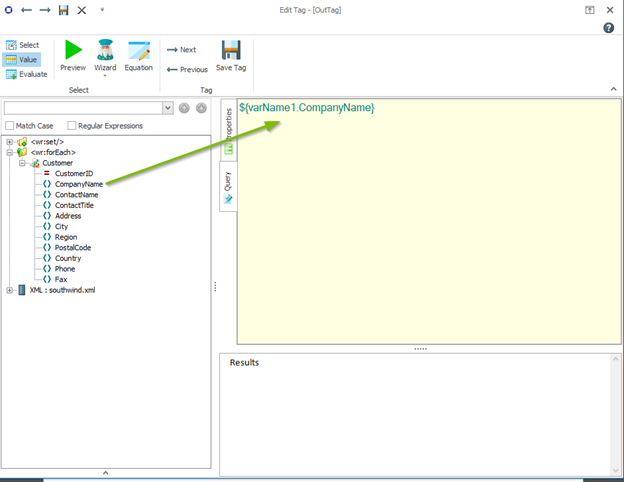
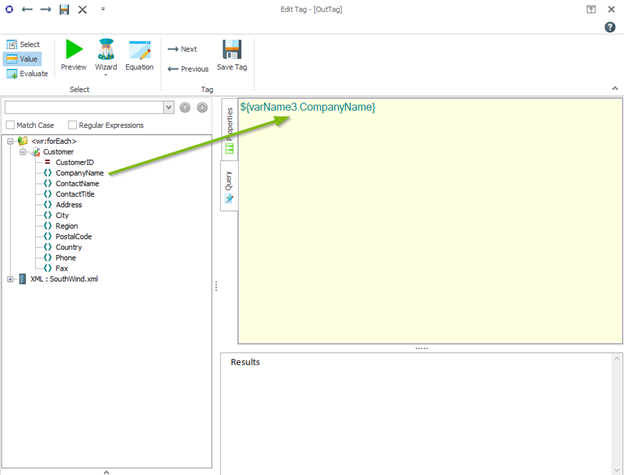
Next we are going to add the customer’s name to the document so we know which customer the orders are for. After the foreach tag place an Out Tag. In the Out Tag drag in the CompanyName node from under the foreach variable.
You can save the tag. After the Out tag, add a couple new lines and insert an End Foreach Tag. At this point your template will look like this:

Create a Running Total
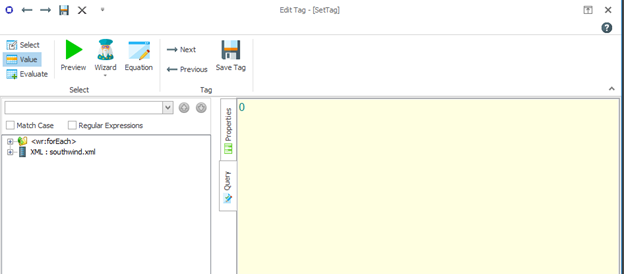
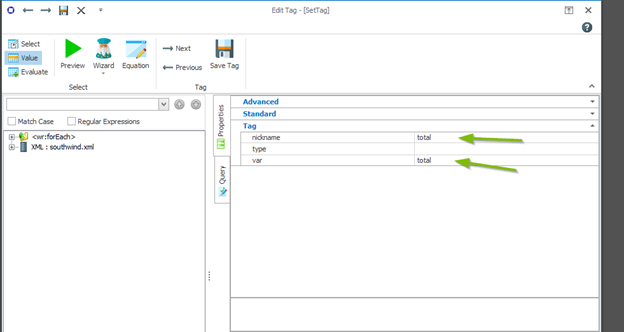
Next, we are going to create a way to keep track of the total cost of orders for the customer so we can display it later. To achieve this we will be using a set tag. To the right of the Foreach Tag, create a Set Tag. In the Set Tag, insert the number 0 as this will be the starting value.
Next, in the properties we will set the “var” value to “total”. You can also give the tag a nickname if you would like. I’ve set the nickname to “total” as well.
At this point this is how your template will look:

Now we are ready to create the table of orders.
Create Table Skeleton for Customer’s Orders
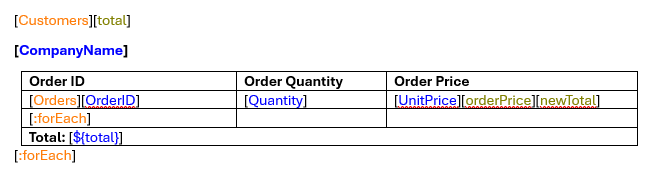
In between the CompanyName Out tag and the End Foreach tag, create a table that is 3 columns and 4 rows. Like so:

Next we will add some headers and a cell for displaying the total. In the first cell ender “Order ID”. In the cell next to it enter “Order Quantity” and in the last cell of the first row enter “Order Price”. Next in the last row of the table, select all cells on the bottom row, right click and select “Merge Cells”. In that new merged cell, enter “Total:”. You can bold all these items as well. The table should now look like so:

Setup the Order Foreach Loop
In this table we will loop over all of the orders for the given customer. In the cell under “Order ID”, create a Foreach tag. In the Foreach Tag, under the Wizard dropdown, choose “Select Wizard”.

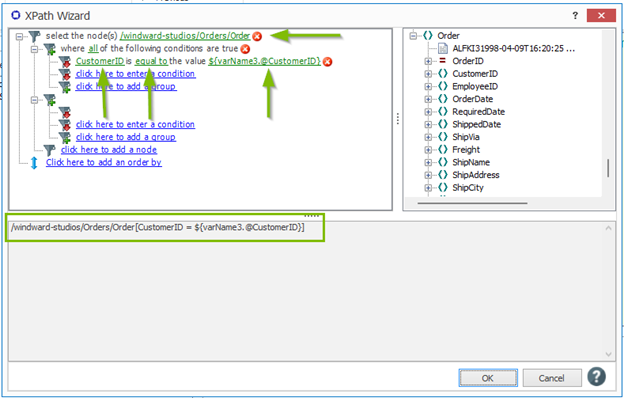
In the select wizard, click on “click here to add a node” and select the Order node then click OK.

After clicking OK, click the “click here to add a group”. This will give you the ability to set a condition. Click on “click here to add a condition”. For the first value select CustomerID from the Order node. For the other value, click on the dropdown and select CustomerID from the Customer foreach. After you have selected those values, click OK.
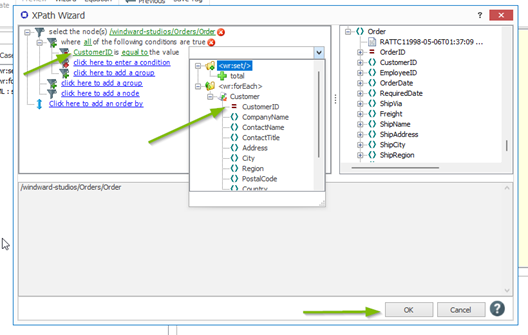
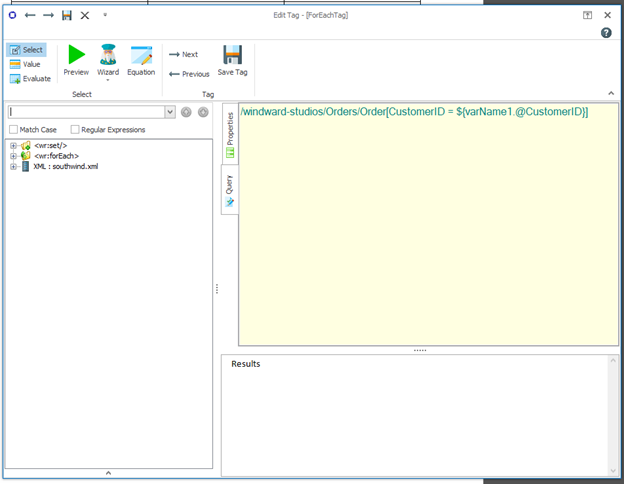
Once you have finished in the wizard, your select in the new Foreach tag should look like this:
Next, go into the properties tab and select “row” for the “order” property:
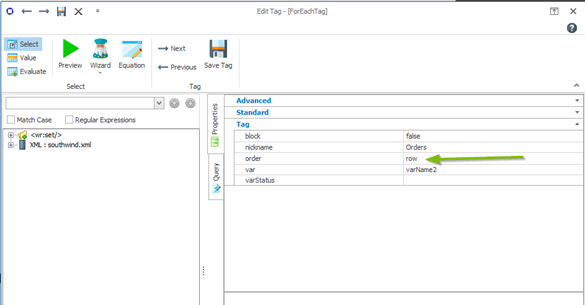
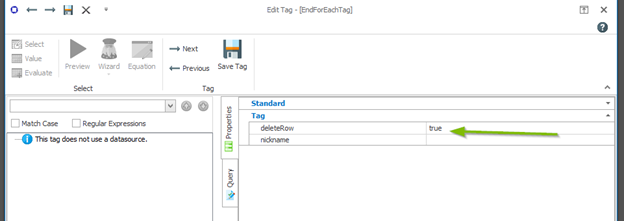
You can also give the tag a nickname, I’ve given it the name “Orders”. Now you can save the tag and close it. On the cell below the new foreach, create a End Foreach tag. In the End Foreach tag’s properties, set “delete row” to “true”.
At this point your table will look like this:

Add Order Values
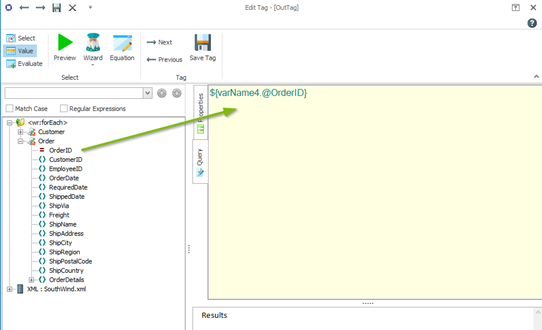
Next we will add a few out tags to display the Order ID, Order Quantity and Order Price. In the same cell as The Order foreach loop, create an out tag right beside it. Drag in the OrderID node from the Order’s foreach.

You can save the tag. Next in the cell under “Order Quantity”, create an out tag and choose the “Quantity” node from under the order details:

You can save the tag. Finally in the cell under “Order Price”, create another out tag and select the “Unit Price” node from under “Order Details” just like above and save the tag. Your table should now look like this:

Updating the Running Total
Now we need a way to update the total cost of all orders for the given customer. Since we have the “total” set tag we created inside the Customer’s loop, for each customer this value will get reset to 0 since its set to 0 each iteration. To increment this value, we need to know how much to increment it by. We will do this by adding the price of each order and multiplying it by the quantity of the order. We will create a set tag to get the price for the individual order. To the right of the Unit Price Out tag, create a new Set tag. In the Set Tag, open the Equation editor by clicking the “Equation” button at the top of the Tag Editor. In the list of Equations, find the “SUMPRODUCT” item and click OK. In the SUMPRODUCT editor, for Range 1, click the dropdown and choose Unit Price from under the Order foreach. For Range 2, click the dropdown and choose Quantity from under the Oder foreach.
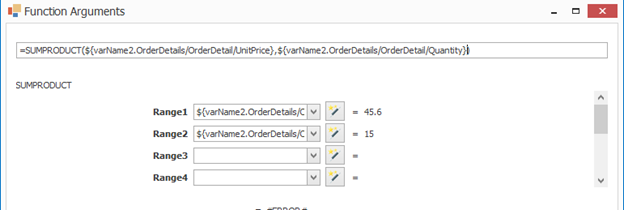
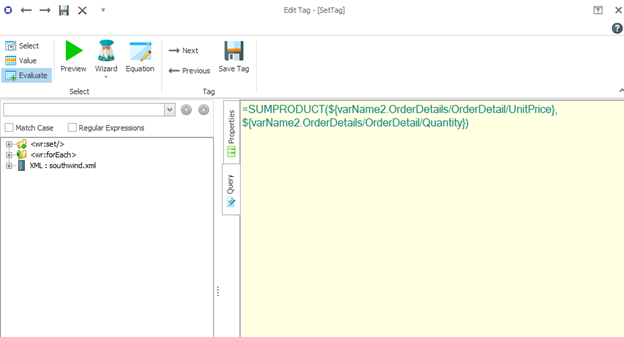
Click Ok and your select in your Set tag’s query it should look like this:
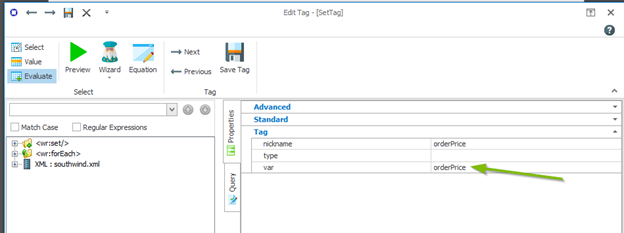
Next, go into the properties tab and choose a name for the “var” attribute. I’ve set mine to “orderPrice”. I gave it the same nickname as well.
You can save the tag. To the right of the orderPrice Set tag, create a new Set tag. This will be responsible for updating the “total” variable. In the new Set tag, drag in the “total” set tag and add a “+” after the “total” variable. Then drag in the “orderPrice” set tag. Make sure the tag is in Evaluate mode in the top left. You set tag should look like this:
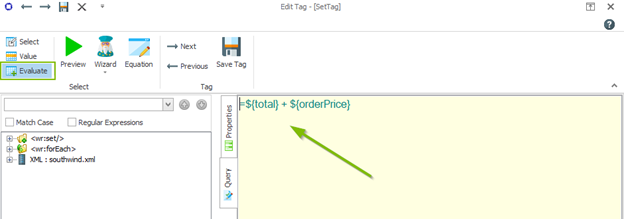
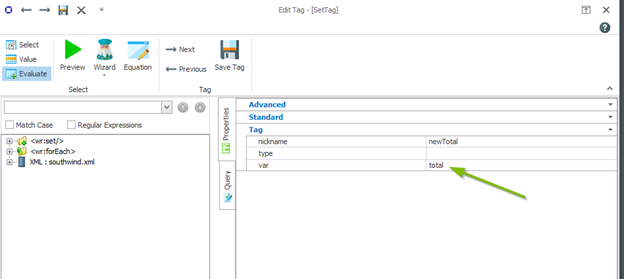
Next, in the properties tab, set the “var” name to “total”.
It is important that this set tag has the same “var” name as the set tag we created outside the table so the value will be continually updated.
I’ve given this tag a nickname of “newTotal” just to help readability:
Now you can save the tag. At this point our “total” variable should be updating with each order.
Displaying the Total
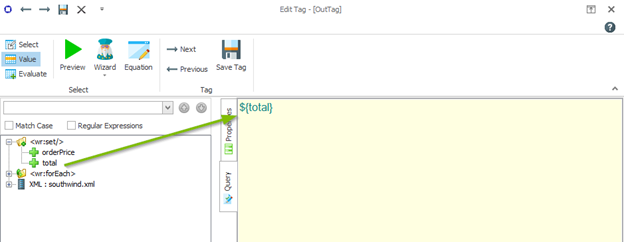
The last step is to display the total in the bottom cell. First, create an Out tag right after “Total:” in the bottom cell. For this Out Tag, drag in the “total” set tag. Your query should look like this:
Next, we want to format this Out tag so it displays in a currency format. Go to the tag’s properties tab. Next to the “format” attribute, click the ellipses button to pull up a helper dialog box.
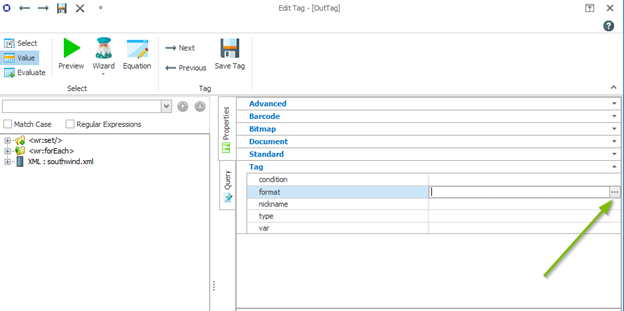
In the editor, choose the “Currency” category and select the first option and click “Apply”.
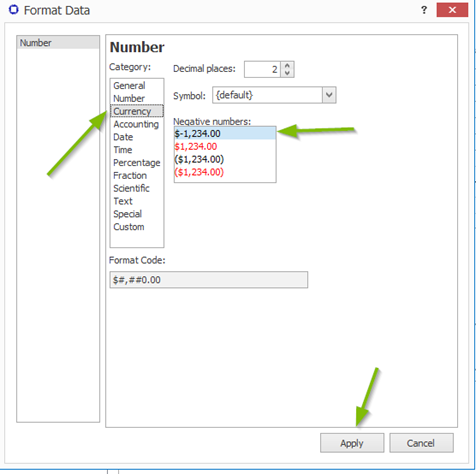
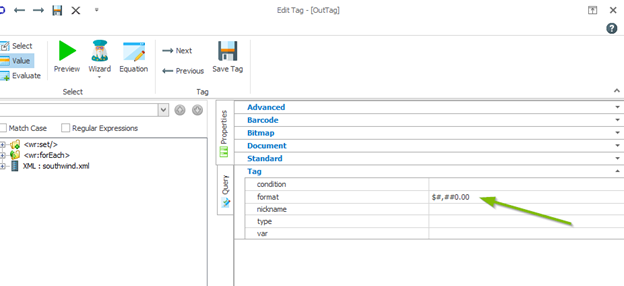
You Out tag’s format should now look like this in the properties tab:
Save the tag and now your table should be complete. Your final template should look like this:
At this point, you have successfully created the template and you can generate output!
Advanced Tables
Here is what the generated table will look like:
Prerequisite: You need to be connected to a datasource. The one we will be using is the SouthWind.xml sample datasource that can be found here: http://xml.windward.net/southwind.xml
Row Foreach Tag Setup
For this we will need 2 sets of foreach tags, a row expanding foreach tag which will loop through all the customers. We will also need a column expansion foreach tag which will loop through all the orders for a customer. The column expansion foreach tag will be nested inside the row foreach tag so we can display the orders foreach each customer individually. To start, create a table with 3 columns and 4 rows like so:

Next in the first cell, create a foreach tag and drag in the Customer node into the query box. I also add “[position() < 4]” so it only queries 3 results so the table isn’t too massive for this demonstration. I also give the Foreach tag the nickname “Customers” in the properties tab and set the “order” to “row”.
After adding the foreach, add an End-Foreach tag into the first cell in the last row of the table. Go into the properties tab of the End-Foreach tag and set “deleteRow” to “true”. After this your table should look like this:

Table Prep for Column Expanding Foreach
Before we setup the column expanding foreach tags we need to format the table a bit more to allow the column to expand in a way that looks pleasant and is easy to read. First, let’s add some titles to our columns. After the row expanding foreach tag, add the title “Customer”. In the next cell over add “Orders” and in the final cell of the first row add “Total” so the table will look like:

Next we will vertically merge rows 2 and 3 in the first and last column so the table appears like:

Next, we will add an Out Tag into the vertically merged cells in the first column. This will display the name of the customer. In that cell add an Out Tag, and then select “CompanyName” from our Customer foreach tag:
Now our table will be ready for the column expanding foreach. The table should look like so:

Column Expand Foreach Tag Setup
The column expanding foreach tag will list off the orders for the specific customer and expand out, adding a new column foreach order, unlike the row-expanding foreach which adds new rows for each node of data. We will start by adding a foreach tag after “Orders” in the second column of the first row. In this foreach we can use the select wizard to help build our select. In the foreach tag you create go to the Wizard drop down and select the Select Wizard. In “select the node(s)”, choose the Order node. Then add a condition. In the condition select “CustomerID” and make sure the comparator is set to “equal to” and for the value, choose “CustomerID” from our “Customers” foreach. The final select wizard should appear like so:
After saving this, go to the properties section in the tag builder and set the “order” to “column”. I also give the tag the nickname “Orders”.
Finally at the end of the query, I added “[position() < 5]” so we don’t have a bunch of orders and this keeps the table looking nice and neat for the purpose of this demonstration.
Next in the cell below (Row 2, Column 2), add the text “ID” and right after that add an Out Tag. In the Out Tag select the node “OrderID” from the Orders foreach tag we just created:
Save that tag. In the cell below (Row 3, Column 2) add the text “Price” and add an Out Tag after that and drag in “UnitPrice” from the Order Details located within our Orders foreach variable:
Immediately after the UnitPrice Out Tag, add an End-Foreach tag. In Tag Processor 2, column expanding foreach tags will expand everything within the block between the start and end foreach. In our case since the start foreach is in cell (Row 1, Column 2) and our end foreach is in (Row 3, Column 2), the column expansion will expand (Row 1, Column 2), (Row 2, Column 2) and (Row 3, Column 2). However for instance, if we had the end foreach in (Row 3, Column 3), then the foreach would expand (1,2) (2,2),(2,3) as well as (1,3), (2,3) and (3,3). After placing that End-Foreach tag our column expansion should be ready and the table should now look like:

Adding the Running Total
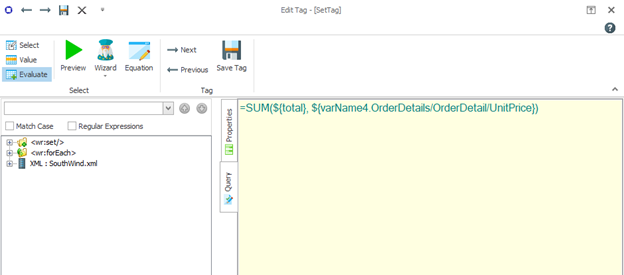
The final step for this table is to create the running total for the price of the orders. We will achieve this with set tags. First, right after the “CompanyName” Out Tag, add a new Set Tag. Enter “0” in the query box and change “Select” to “Value” in the top left of the Tag Builder.
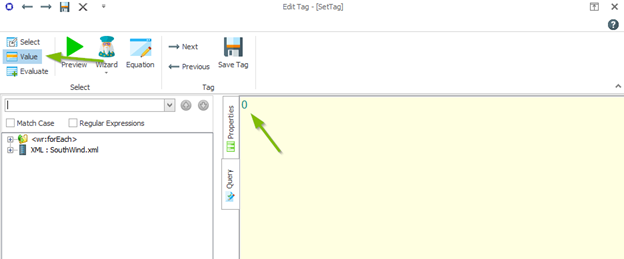
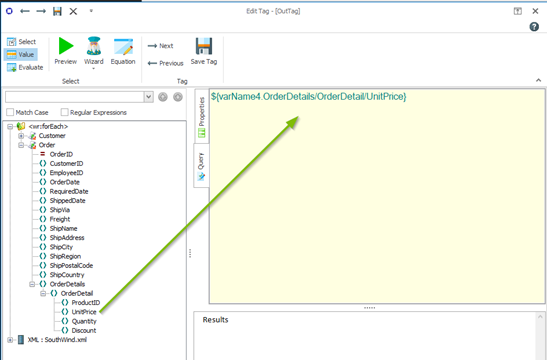
In the properties tab, set the “var” to “total”. I also set the “nickname” to “Total”. Save this tag. Next, we will add another Set Tag right after the “OrderID” out tag. In this set tag we will use the SUM() macro. For the first parameter we will use our “total” set tag variable and as the second parameter we will use the UnitPrice so the final query should look like so:
Note: ${varName4} may be different for you. This should correspond to the name in the “var” property of the column expanding foreach.
After you create the query, make sure to go to the properties tab and set the “var” to the same name as the first set tag. In our case we will set it to “total”.
This will ensure that the “total” variable is updated with each iteration of the column expanding foreach. Once the column expansion finishes and we move onto the next customer in our row expanding foreach, the first set tag will reset the “total” variable to 0 so we have a fresh counter for the new customer.
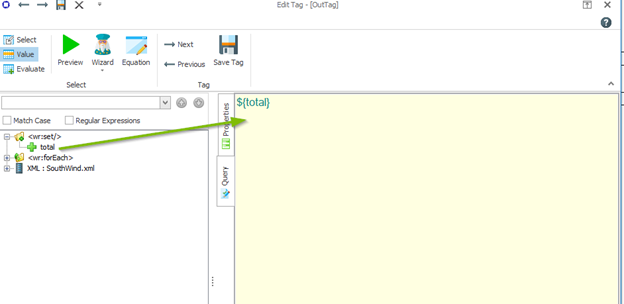
At this point our table is almost done. The final tag we will need is in the vertically merged cells in the final column. Add an Out Tag and simply drag in the “total” from the set tags like so:
Save the tag and all the logic should be finished. The table should now look like:

Styling the Table
Now that the logic is finished, we can add some style to the table. This is up to you how you would like to style it, but I added some cell backgrounds to the header row. I also bolded all the plain text as well as the “CompanyName” Out tag. I also added a “$” before the “total” out tag so a dollar sign appears in output. Finally, I made the header row small caps. The final table looks like so:

At this point your table is finished!