Document Tag Reference
The Document tag is an extension of the Out and Import tags that is more use-case specific. It is equivalent to the Import tag, or an Out tag with the type property set to TEMPLATE, BASE64_TEMPLATE or HEX_TEMPLATE. The embedded document may be an image, a text file, a PDF file, or even another template! For example, you might want to import a cover sheet or company logo. The Document tag is a powerful tool for creating complex reports with multiple data sources and document types.
Document Tag Functionality
The Document Tag tells the template to retrieve document data from the specified location. This tag is unique in that it is represented in the file as an document object, rather than text. This allows certain properties such as child styling and others to be applied to the final output document, as well as importing Fluent templates with fluent tags into your document.
Document tags can reference document data contained directly in the datasource as Base64 (or HEX) encoded string of an document document, or document data linked externally at a URL or document path. This behavior is determined by the reference-type Tag Property. Document tags with a direct reference-type value will pull document data directly from the datasource, while tags with an indirect reference-type will assume the document is being linked from an external location.
Here is a sample template that demonstrates the Document tag and reference-type usage: Document Sample Template Download. You will also need the accompanying datasource: Document Sample Data Download. Make sure the datasource file is in the same directory as the sample template.
Document Properties
Tag Properties
reference-type (default: direct)
Determines how to reference the data in the tag.
- direct - Data will be treated as a Base64 encoded string of a document
- indirect - Data will be treated as an external link to a document view a path or url
nickname (optional)
The nickname to reference the tag rather than the generic "[document]" label. Descriptive nicknames can be very important in designing complex templates.
default (optional)
This property is set to the URL or document name of an document document to reference in case the Document Tag's query returns no rows or nodes, or causes an error such as "document not found".
connection-string (optional)
Use this property to select an Authentication Protocol and its properties. For more details, see Data Access Providers and Authentication Protocols.
type (required)
Use this property to specify the type of document data being referenced. The options are:
- PDF - if the file to be imported is a PDF document
- TEMPLATE - if the file to import is a subtemplate or HTML file with no special encoding.
- BASE64_TEMPLATE - if the file to be imported is a Base64 encoded document
- HEX_TEMPLATE - if the file to be imported is a HEX encoded document
- TXT - if the file to be imported is a text file
Document Tag of type TEMPLATE are not supported by Fluent PowerPoint Templates, so HTML cannot be rendered
If you output to PDF, the imported PDF file(s) are separate pages inserted at the beginning of your report. The Report Designer and Report Engines start a new page, add the imported file as the next N pages, then resume the report at the top of a new page following the imported PDF. If there are two PDF imports in a row, the second starts on a new page after the first. In other words, the imported PDF pages are not modified or combined with any Fluent Reports commands; they are inserted at the start of your report.
Other formats that are page-based (DOCX, XLSX) will have a single blank page for each imported PDF file. Other formats that are not page-based (HTML) will skip the PDF file. For the Java engine you need the JAI Image I/O libraries installed. Please note that this is not the entire JAI library. It is just a set of additional reader-writer plug-ins for the java 1.4 javax..image.io classes. AutoTag uses the .NET engine to generate reports and so this is not an issue for AutoTag.
Document Properties
break (optional)
before-page - places a section page break before the import
after-page - places a section page break after the import
before-inline - places a section page break before the import
after-inline - places a section page break after the import
distinct - places the section page break before and after the import, removing empty paragraphs before and after the Import Tag. If preceded by a section break or document start, the imported section will be assigned to that section and there will not be a preceding section break. The original settings in the master document will be assigned to the trailing section break.
page - places a section page break before the import (this is the default)
even - places an even page break section before the import
odd - places an odd page break section before the import
inline (optional, default: false)
To understand when to use the use-child-styles property, it is important to distinguish between the two ways to format text in templates and subtemplates: direct formatting and Word Style formatting.
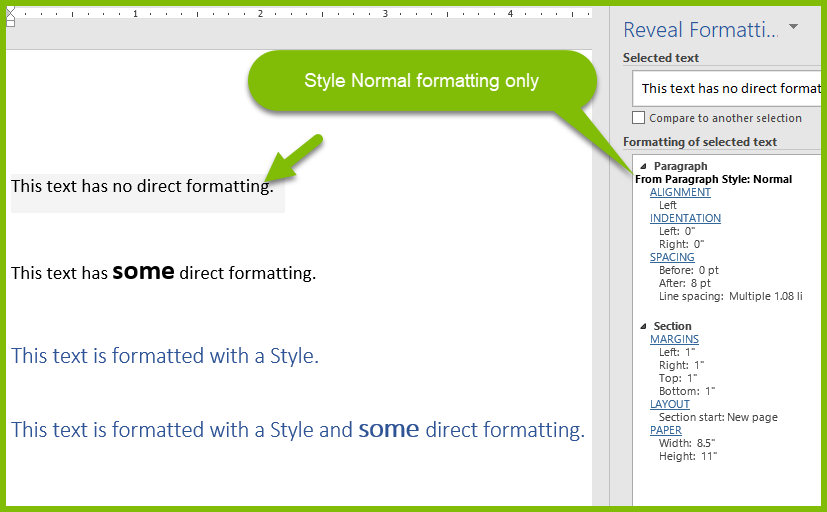
Here are some examples to illustrate the two different formatting methods using a Word document with the Reveal Formatting Pane enabled (SHIFT-F1).
By default, when a Word document is first opened, there is no direct formatting - only the Word Normal Style is in effect, which basically means "no formatting has yet been applied by the user".
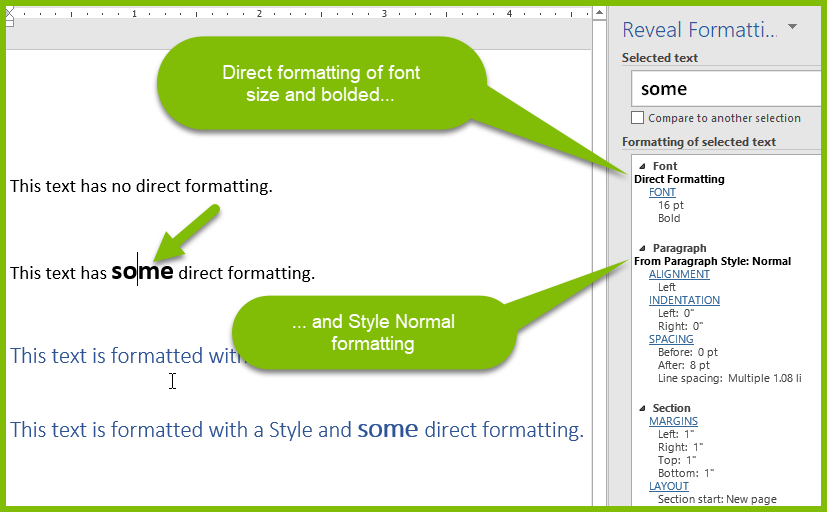
Changing settings in the Font or Paragraph sections of the Home tab of the Word ribbon, such as font size, paragraph line settings, etc., is direct formatting.
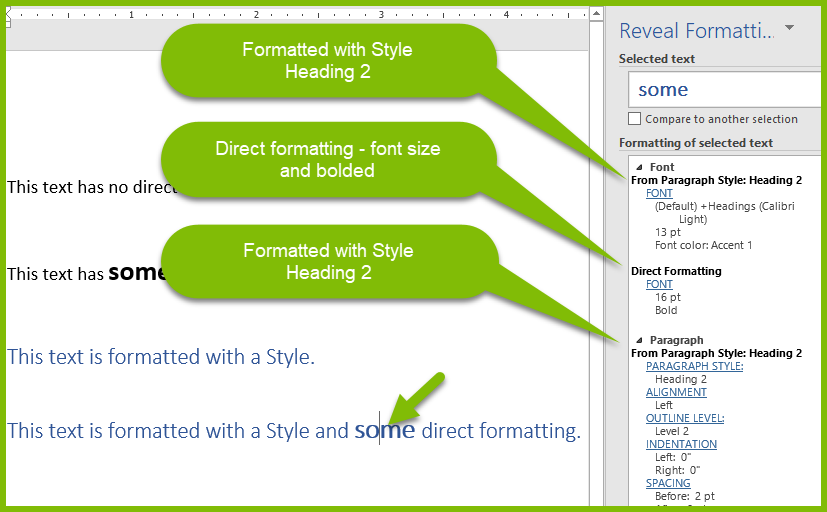
Applying a Style from the Styles section (the Styles Gallery) of the Home tab is formatting with a Word Style.

Both Word Styles and and direct formatting can be, and often are, combined.
To understand when to use the use-child-styles and use-parent-format properties mentioned below, it is important to first understand the two ways to "style" text in a tag:
- Using a Word Style from the Style Gallery in the Styles section of the Word Home ribbon. If the imported text is in a Word document, by default it has the 'Normal' Style. You can also apply another Style from the Style Gallery, or create a custom Style and apply it.
- By "direct formatting", which is every other method for changing font attributes, like using the Font section of the Home Tab in the Word ribbon, HTML tags, etc.
In particular, for case #1 above, if the Word Style of the report template and the Word Style of the imported text have the same name, then use these properties to choose which Word Style to use.
use-child-styles (optional)
This property has effect only when the master template and imported subtemplate use Word Styles with the same name, but different settings. It has no effect if the master template and imported subtemplate use Word Styles with different names, or don't use non-default (i.e. Normal) Word Styles. In the latter case, the imported subtemplate Word Style is applied to the report output.
If the master template and imported subtemplate use Word Styles with the same name, but different settings, then:
- true - use the Word Style settings of the imported subtemplate
- false - use the WordStyle settings of the master template In any case, direct formatting in the imported subtemplate is applied to the report output. This property only effects Word Style formatting, not direct formatting.
use-parent-format (optional, default: false)
Use this setting to strip the direct formatting from the text to be imported as in case #2 above:
- true - use the direct formatting of the imported text
- false - use the direct formatting of the report template
This property has no effect on case #1 above.
Standard Properties
description (optional)
A brief description of this Tag.
enabled (default: on)
Controls whether a Tag is executed when generating output. This can be useful when debugging a template.
- on - this Tag will be executed when output is generated.
- off - this Tag will not be executed when output is generated.
- engine-only - this Tag will be executed only if output is generated using one of the Report Engines.
- autotag-only - this Tag will be executed only if output is generated using Report Designer.
Advanced Properties
display (optional, default: always)
Set this property to determine whether or not to display data. The default value can always be overwritten using the display.default setting in the properties or configuration document. Options for display are:
- notEmpty - display the output data only if the data returned is not an empty value or empty string
- notNull - display if the data node or field exists, even if it is an empty string (an empty string is not NULL since NULL is an actual value in a database)
- always - (default) display even if the data does not exist (a blank will show if the data does not exist).
- A Boolean expression that evaluates to true or false. For example, if you have a Set Tag variable "${variable}" whose value is a number, and you want your Document Tag to display its contents only if that variable's value is greater than two, then set display to "${variable} > 2".
error-handling (optional)
Selects which types of errors produce warnings rather than exceptions, which allows output to be generated despite the error.
- Ignore type error - these errors occur when a Tag's defined data type is different than the data type of the data returned by the Tag's query
- Ignore formatting error - these errors occur when a Tag's specified format is not compatible with the format of the data returned by the Tag's query
- Ignore select error - these errors occur when a Tag's query fails to find valid data
- Node must exist - these errors occur when a row or node is queried which doesn't exist in the data source. These errors typically return an empty value that is output without warning.
- Node must not return NULL - these errors occur when a query returns an empty or NULL value. These errors typically return an empty value that is output without warning.
- Treat warning as error - forces all of the above error-handling warnings to appear as errors (not exceptions). This is useful when used with Report Designer's Verify feature.