How Do I Create a POD?
What Are PODs?
PODs are a way to save something you created in Microsoft Office which can be reused later by a simple drag and drop. POD is a term specific to Fluent products that defines a group of items in a Template as specified by the report designer. Portable Object Doclets (PODs) are portable snippets of Microsoft Word or Excel objects, meaning they can be moved and used in other Templates. The stored PODs of information can be helpful in a number of circumstances.
PODs can be saved and used in any Word or Excel Template and may contain
- Fluent Tags
- Data source connections
- Variables
- Blocks of text
- Tables
- Images and more
When you create a POD, you create an XML file that defines all the Tags and their associated data source connection information. You can create this file coding it by hand, but a faster and easier way is to use Report Designer's built-in functionality shown below.
Create POD Doclet Interface
To bring up the Create POD Doclet Interface, click on the "Create POD" button on the Fluent tab of the Office ribbon, and select "Data Source" or "Standard" POD. The interface for the two different POD types are slightly different, as we shall see.
Create POD Datasource(s) Dialog
Datasource(s): Select the data source for this POD file
POD file: Select a name for the POD file (.rdlx)

Create POD Doclet Dialog

POD Type Pane - define the type of selection made in the Template to be created as a POD
Selected - create a POD for a highlighted region
Tag on - create a POD for a highlighted Tag
Paragraph on - create a POD for all selected items before the Tags before the end of the paragraph (i.e. paragraph return character)
Cell on - create a POD of the selected cell within a table
Table on - create a POD of the selected table
Entire document - create a POD that will copy the entire document including all Tags
POD name: the nickname for a POD. This will appear in the POD Bin.
POD file: this field holds one of three values
- the full pathname of the currently loaded POD file, or
- browse... - launches a browser window to navigate to an existing POD file. The window only shows .rdlx files, or
- new... - launches a browser window allowing you to create a new POD filename.
Description (optional): a description of the POD's contents or purpose to help users identify the POD's use.
An Example POD
Before creating doclet PODs you must create a Data Source POD first.
Create a Data Source POD and POD File
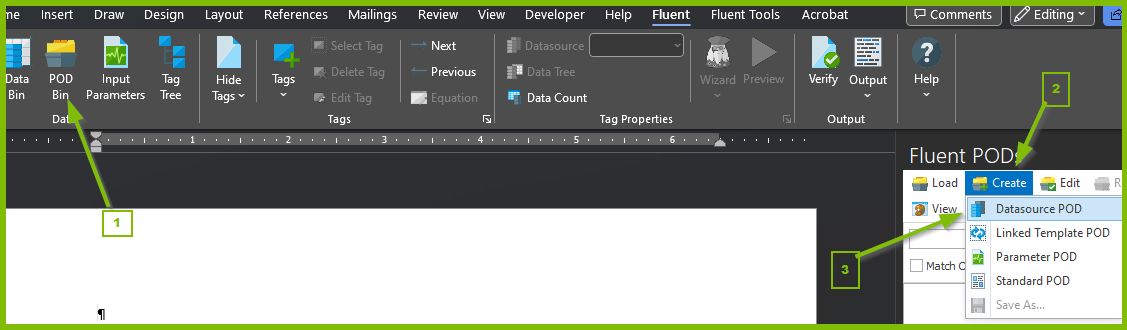
Click on the POD Bin button on the Fluent tab of the Office ribbon. Next, click the Create button in the Fluent PODs pane and then click the "Datasource POD" button.
The "Create POD Datasource(s)" dialog appears. The dialog displays all of the data sources connected to your Template. The dialog is used to create a POD (.rdlx) file. Select the data source for which you wish to create a POD, then use the "Browse..." button to enter the name and location of the POD file.

A pop up notification will appear on your screen confirming you have successfully created a data source POD.

Create a Standard POD
Now we are ready to create a Standard POD. For this example, we'll use the attached Template.
Variable_Invoice_Sample_-_Template.docx
First, create a data source POD as shown above. Then select the region of the Template you wish to include in the doclet POD.

Go back to the Fluent PODs pane. Click the "Create" button and this time select "Standard POD" to launch the Create Standard POD window.

- Choose "Selection" for the POD option in the left-hand pane. We use this option because we have highlighted and selected several items in the Template as opposed to the whole document or other elements.
- Enter the name "Address" to your POD under Pod name.
- Next, click the dropdown menu for the Pod file (either browse or the dropdown) and pick "new" to make a new POD. This will bring up a dialog to name and save your new POD file to a specific location.
Make sure that you do not write over an existing POD file.

In the new window, enter the filename "POD Example.rdlx" for your POD filename, then click on Save.

Back in the Create POD Doclet window, enter a description. In this example, we'll add the text "Address block including Company and Contact Name" in the "field (which is optional)." Then click on OK to save the POD file.
You have created your first POD! Now go to these articles to learn how to load and use PODs.