How Do I Connect to an IBM DB2 Data Source?
info
In this article we demonstrate how to connect a Report Template to an IBM DB2 server. For more details about the Connection Editor, see the Connection Editor Reference.
What is Needed To Establish the Connection
- In a browser, navigate to https://www.ibm.com/support/pages/download-initial-version-115-clients-and-drivers
- Click on "IBM Data Server Driver Package (DS Driver)"
- Log in to IBM
- Select the appropriate operating system, e.g. Windows 64-bit
- Click on Continue.
- Fill in the form
- Check on the "I agree" checkbox
- Click on "I Confirm"
- Select the "Download using http" tab
- Click on "Download now"
- After the download, run the installer (e.g. "ibm_data_server_driver_package_win64_v11.5.exe")
Connect Your Report Template To IBM DB2
From Microsoft Word, Excel, or PowerPoint, navigate to the Fluent Manager tab. Once on the Fluent Manager tab, click on the Data Sources button to expand the drop down, then click Data Sources, this will bring up the Connection Editor:

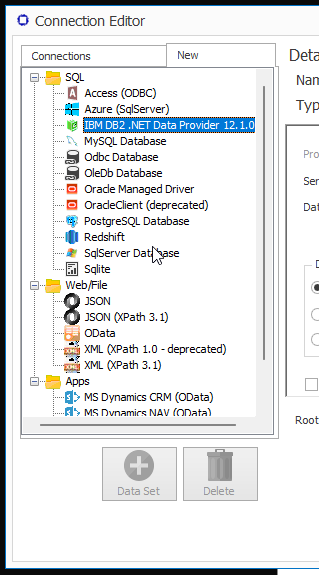
- In the Connection Editor window click on the New tab.
- Click on IBM DB2 .NET... in the SQL section. The Details pane will change to prompt you for your data source details.
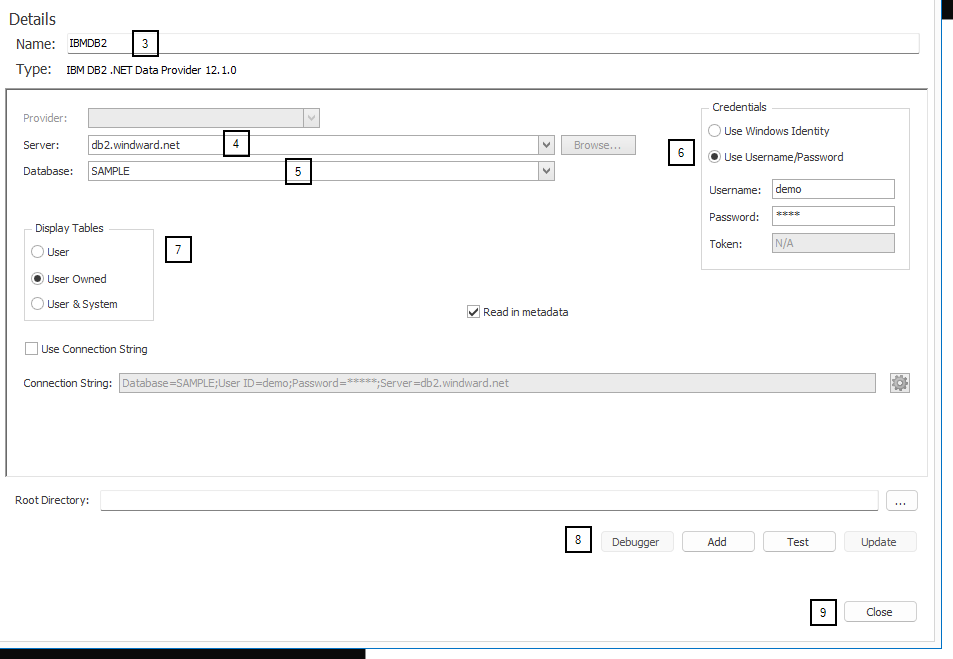
- Enter a Name for your data source connection.
- Type or paste the name of the desired DB2 server, or browse to the location of the DB2 server. This list will auto-populate with the names of DB2 servers on your network configured to respond to a network query asking for their names. You can type in the name or select from the list.
- Enter the name of the desired database. This list will auto-populate from the DB2 server once it is set. In most cases you will also need to enter your username and password for Report Designer to auto-populate the list of databases. You can type in the name or select from the list.
- Enter your credentials. (The Fluent public DB2 server db2.windward.net username and password are "demo" and "demo" without the quotes).
- In the Display Tables section, select User Owned.
- Click on Add, then Test, to test your connection. If all parameters and credentials are correct and a connection is made, you will receive a successful notification.
- Click on Close to save your information.
Other (Optional) Connection Editor Fields
| Field | Description |
|---|---|
| Read in metadata | Check this to read in additional information from the database, primarily the descriptions of tables, views, and columns, and the primary key - foreign key relationships. You should always keep this checked. |
| Use Connection String | You can enter the connection string directly instead of entering the Server, Database and Credentials. When unchecked it will display the connection string Report Designer generated from your settings. |
| Root Directory | This is the optional default directory for any Import Tag requests where the requested file does not have an absolute path. If left blank, Report Designer will use the directory where the data source file is located. If the data source is not a file it will use the directory where the template is located. |
caution
Each flavor of DB2 uses different options to read in metadata. If you connect to your DB2 server, but Report Designer does not display any database tables or views in the Data Bin, then please refer to [Overriding DB2 Metadata].